Offline Order
CT Orders is designed to create and manage orders via different channels. Using the CT Mobile app on iOS and Windows platforms, create orders on the spot in offline or online mode and send them to Salesforce during the synchronization.
-
Integrate the CT Mobile solution with the target system, such as CT CPG, CT Pharma, or CG Cloud.
-
Map the CT Orders objects with the target system for applying the overall logic.
-
Follow the guide to enable work with CT Orders in the CT Mobile app.
-
Take a workshop on how to create an offline order in the CT Mobile app.
In this article, you will find the necessary user permissions, a description of the Order Cart screen, conditions for displaying products, the steps to follow when creating an order, and a description of additional options.
1. User Permissions and Synchronization
Before starting to work with offline orders, please verify that the mobile users have the appropriate permissions for objects.
2. Create and Manage Orders
When the CT Orders is activated and customized for offline work and a mobile user performed the full synchronization:
-
The CT Orders menu item is available on the main menu.
-
Specify list views for sorting Order records.
-
Add Order custom related lists to the Accounts, Contacts, or Activities objects to manage orders.
-
-
The Order button is available on the Accounts, Contacts, or Activities records for order creation.
-
Tap the
 icon, specify the required data in the mini layout, and tap Create.
Configure the layout setting for CT Order object to set up displayed fields in the mini layout. 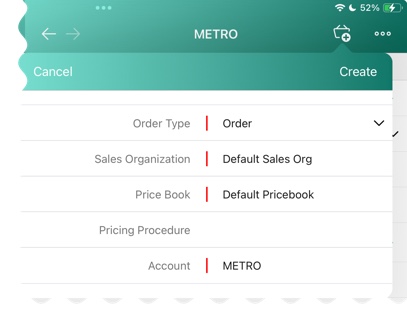
-
Edit the new order on the Order Cart screen.
-
3. Edit the Order Cart
On the Edit Cart screen, the mobile user manages the current order.
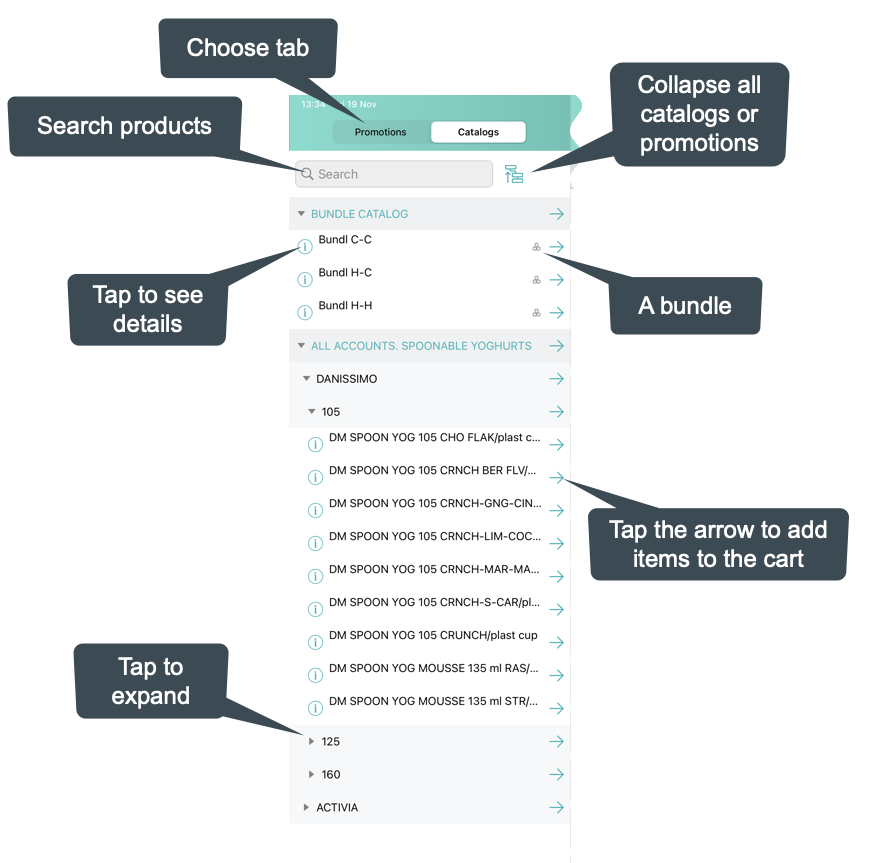
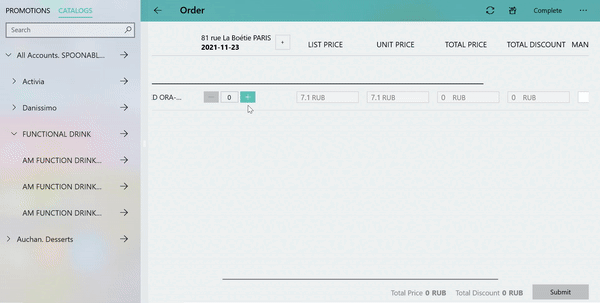
3.1 Promotions and Catalogs
|
On the left side, select products from available promotions and catalogs. The Promotion tab is displayed by default.
|

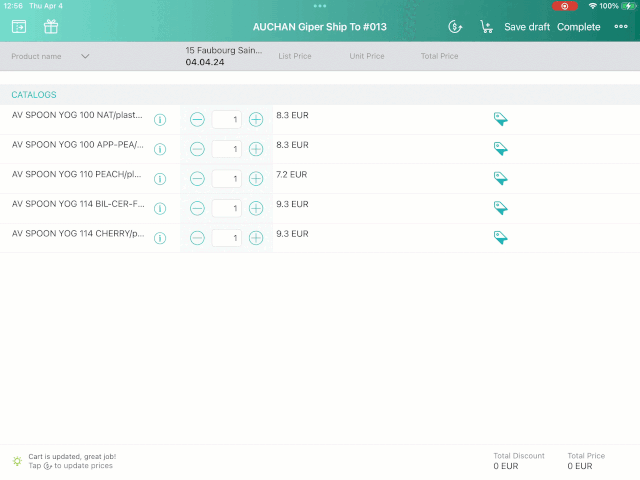
3.2 Order Cart
Add products and manage them on the order cart.
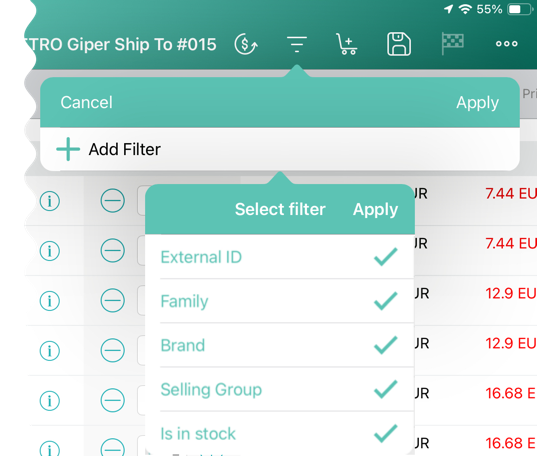
Add and Remove Products
Filter products
|
CT Order Cart overview:
Product filter:
|

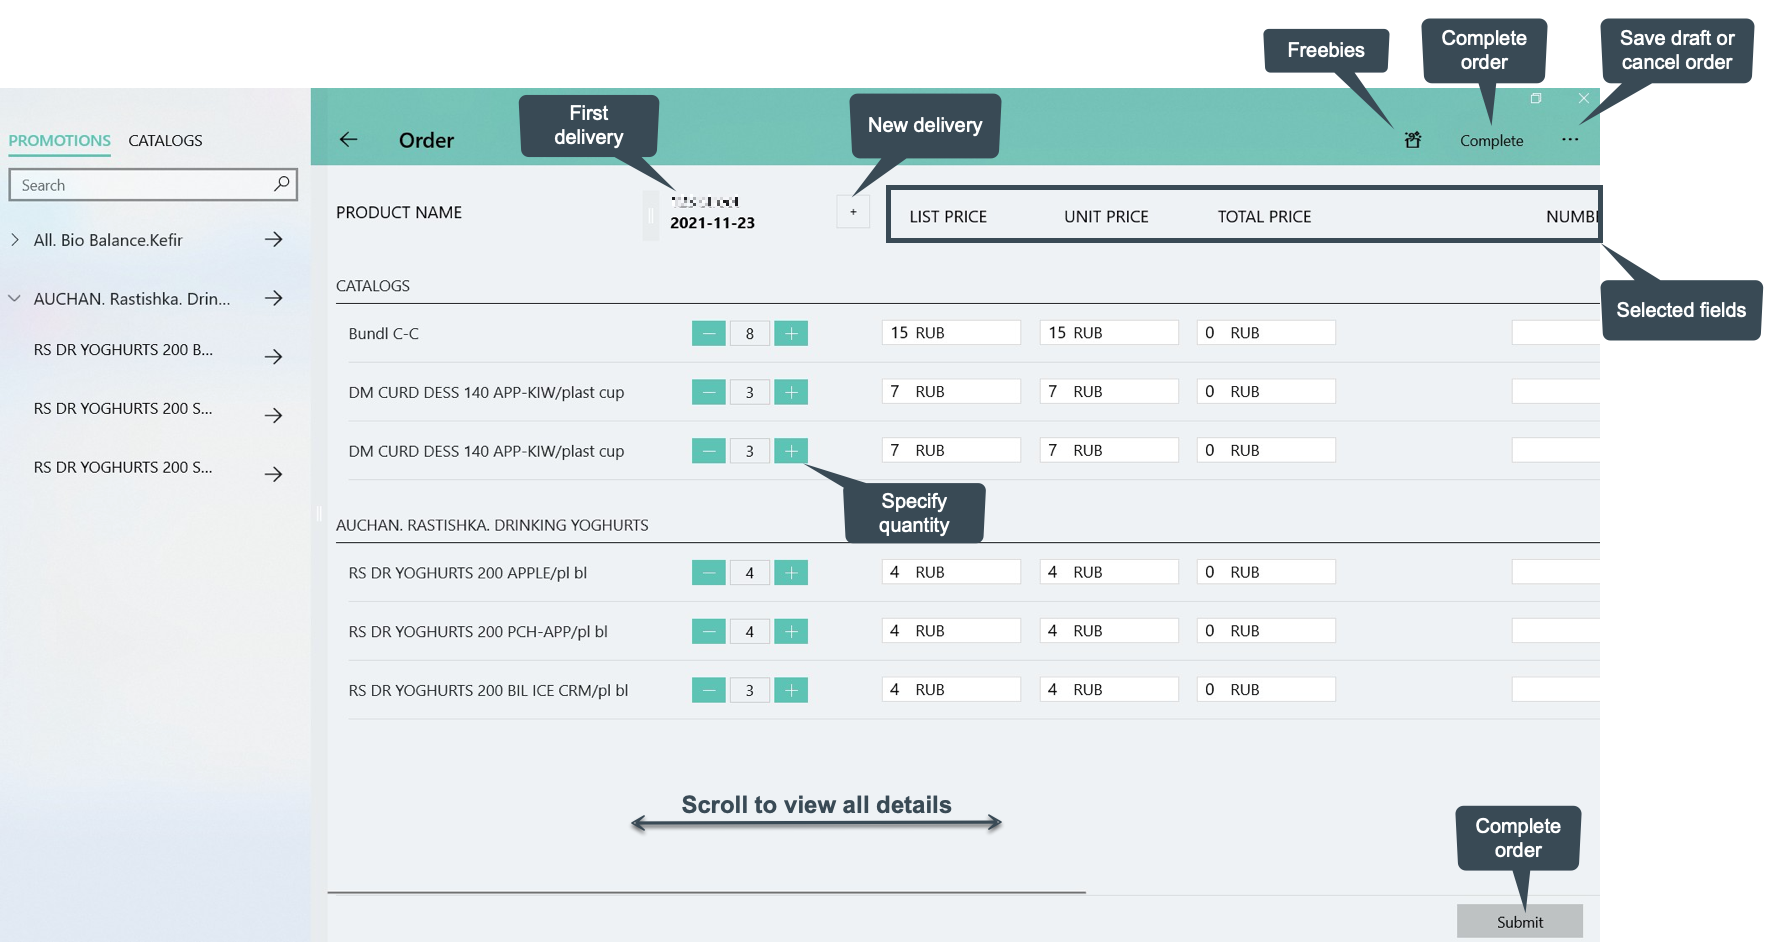
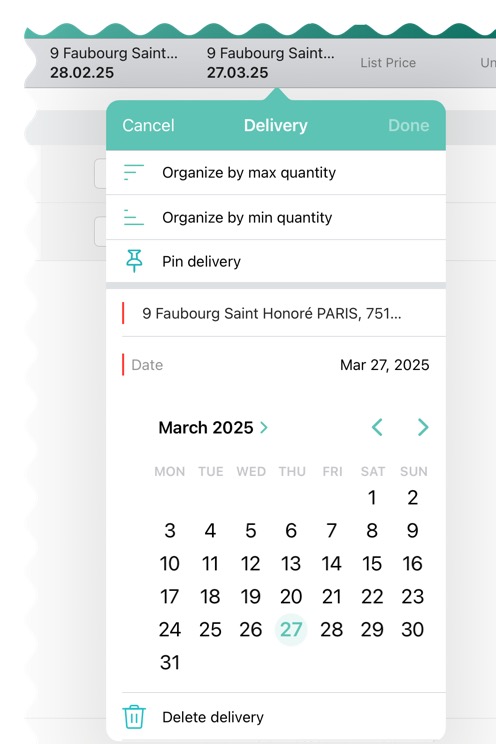
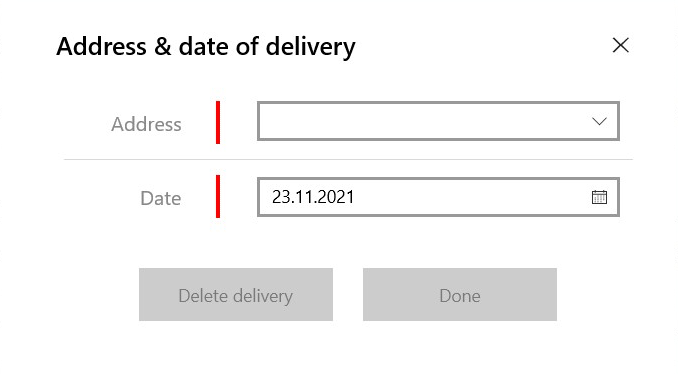
3.3 Create the First Delivery
When a mobile user adds the first product, the Delivery pop-up appears. Delivery dates are controlled by the Settings record with the Limit Setting record type. To add delivery limits, follow this guide. To set up delivery addresses, refer to this article.
| The mobile user cannot delete a single delivery. |
-
If no limits are set, the first delivery date is set as the current date and the end date is set as the last date defined by the calendar.
-
Deliveries are sorted by date. If multiple deliveries are added for the same date, they will be sorted by the Address field (in ascending alphabetical order).
-
The Address field is populated based on the Address Setting record defined for the Sales Org.
In the CT Mobile iOS app, tap the Expand Order Cart icon to hide the catalogs and promotions on the left side for a better experience with items in a filled cart.
3.4 Add More Products and Specify Product Quantity per Delivery
Add more products to the cart.
-
Tap the
 icon (iOS) or tap the Plus button next to the first delivery (Windows) to create one more delivery if needed.
 -
Set quantity of each product for each delivery using the plus and minus buttons.
-
The quantity will change proportionally based on the multiplicator value for each product.
-
More details about the product and bundle calculation are available here.
-
After making changes to the order cart, new prices will be calculated automatically on the timer, if the Web Service is disabled.
-
-
Organize products in cart by max or min quantity for the selected delivery.
-
Pin delivery as the first one in the order cart.
-
Delete delivery if needed.
-
For CT Mobile iOS users
-
For CT Mobile Windows users
3.5 Review the Order
-
When the cart is full and all deliveries are set, review the order price and discounts in the Total Panel at the bottom of the screen.
-
To customize fields in the total panel, create the Settings record with the Totals Panel Setting record type with custom fields. The maximum number of fields displayed is 4.
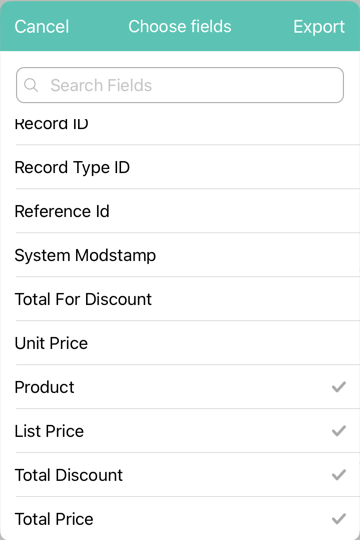
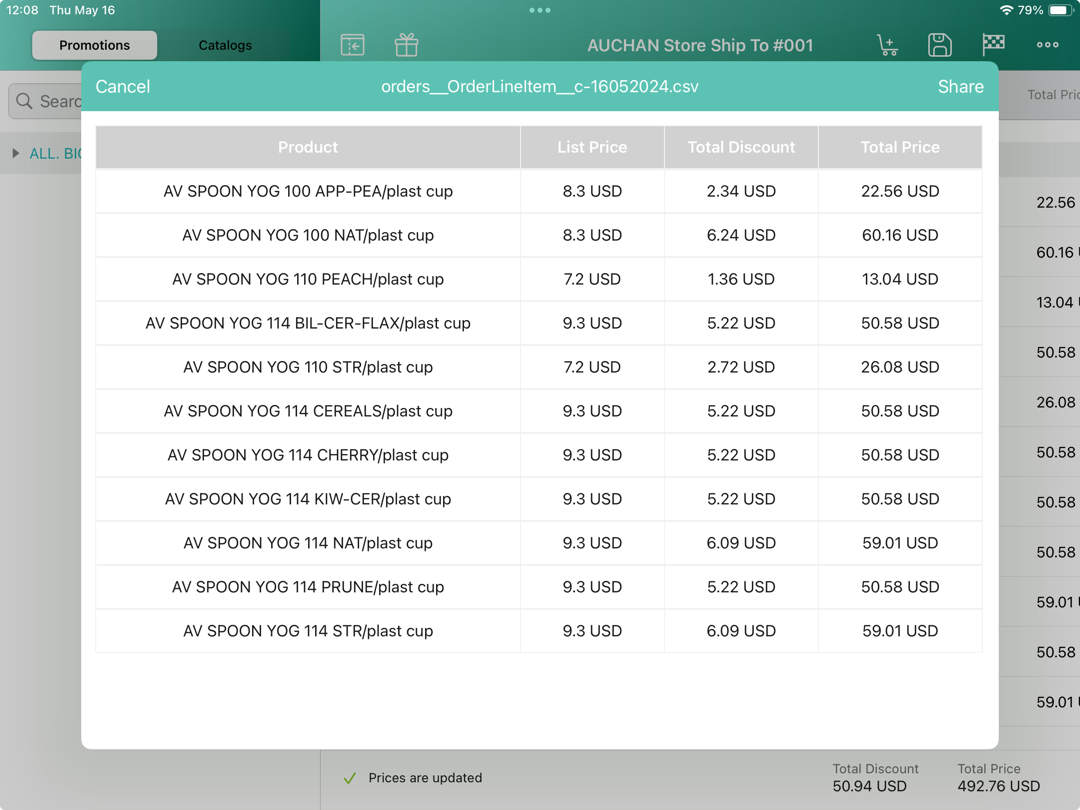
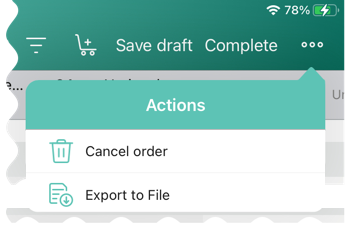
3.6 Export Order Data
To enable this feature, configure the Export CSV setting.
-
Tap Actions menu → Export to File.
-
Select fields to export (or leave preselected fields, if they are configured in the Export CSV setting).
-
Tap Export.
-
Tap Share to open standard iOS sharing dialog.
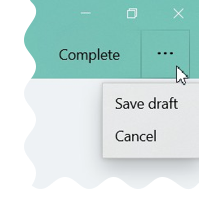
3.7 Complete the Order
Depending on the mobile user’s decision, the order status will be changed. We recommend getting familiar with the Order Change Manager logic. Do not manually change the Stage value on the Order record screen to avoid missing validations.
|
|
4. Additional Options
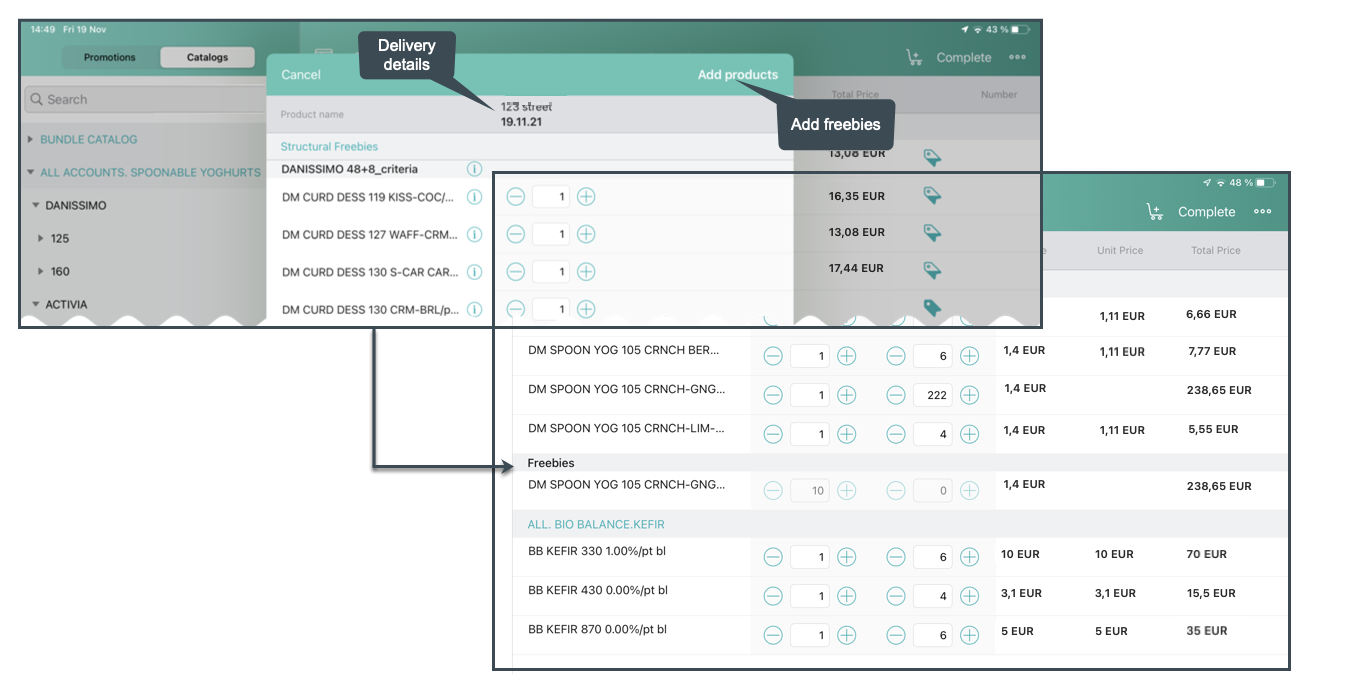
4.1 Freebies
If specified, tap the Freebies button.
-
Review freebies for a delivery and tap Add products. Freebies will be validated and added to the cart.
It is possible to set up freebies distribution. For example, use the Delivery Control option to add freebies to the first or last delivery. -
If the quantity of the cart products has been changed, tap the Freebies button again to recalculate freebies to the order.
-
For CT Mobile iOS users
-
For CT Mobile Windows users
The feature has not been implemented yet.
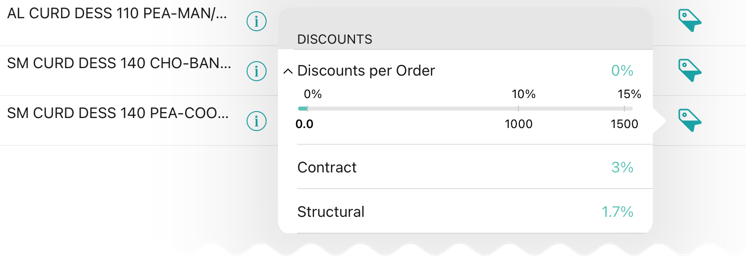
4.2 Price Tags
If specified, the Price Tag icon next to the added product indicates the status of the discount. Tap the icon to view a currently applied discount.
-
For CT Mobile iOS users
-
For CT Mobile Windows users
The feature has not been implemented yet.
4.3 Delivery Summary
The Delivery Summary pop-up is used to review and edit (if needed) the delivery details. For more information, refer to Delivery Summary.
4.4 Calculate Price using the SDK Step
If the SDK step is implemented, the Calculate Discounts button appears on the Order Cart screen. Tap the button to calculate discounts.
-
For CT Mobile iOS users
-
For CT Mobile Windows users
See also: