Calendar Interface and Activities
Get familiar with the available interface elements:
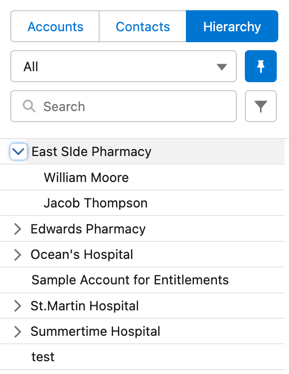
Left Sidebar
There are 3 tabs: Accounts, Contacts and Hierarchy.
-
In Accounts and Contacts tabs, you can select activity target records to create activities in the calendar. By default, these target records are Account and Contact objects, but you can specify another objects in the Pharma Calendar Settings, as well as rename their tabs.
-
Activity target records can also be displayed with their titles and subtitles, if there are fields specified in their compact layouts.
-
Hover mouse pointer over a target record to see its basic information (if it is enabled in the Pharma Calendar Settings).
-
-
In the Hierarchy tab, you can see your activity target records as a hierarchy tree, if you specified the connection object in the Pharma Calendar Settings. For example, you can select the Account Contact Relationship as a connection object to see Accounts and related lists of Contacts.
For all tabs, you can select a list view of the activity target record and search by keywords.
|
Search is performed according to Search Layouts. To make it work correctly, please do not add the owner alias to the search layout. |
To create or edit a list view, go to the target object and follow the standard Salesforce flow. For the Hierarchy tab, list views of the parent object are used. The All list view is created by default for all objects.
-
Click
 to set a list view as default.
 -
Click
 to select sorting option. From the drop-down list, select the field on the object to sort by, and click
  or
or  to sort from A to Z or vice versa.
 -
Click
 and
and  to hide and show the left sidebar.
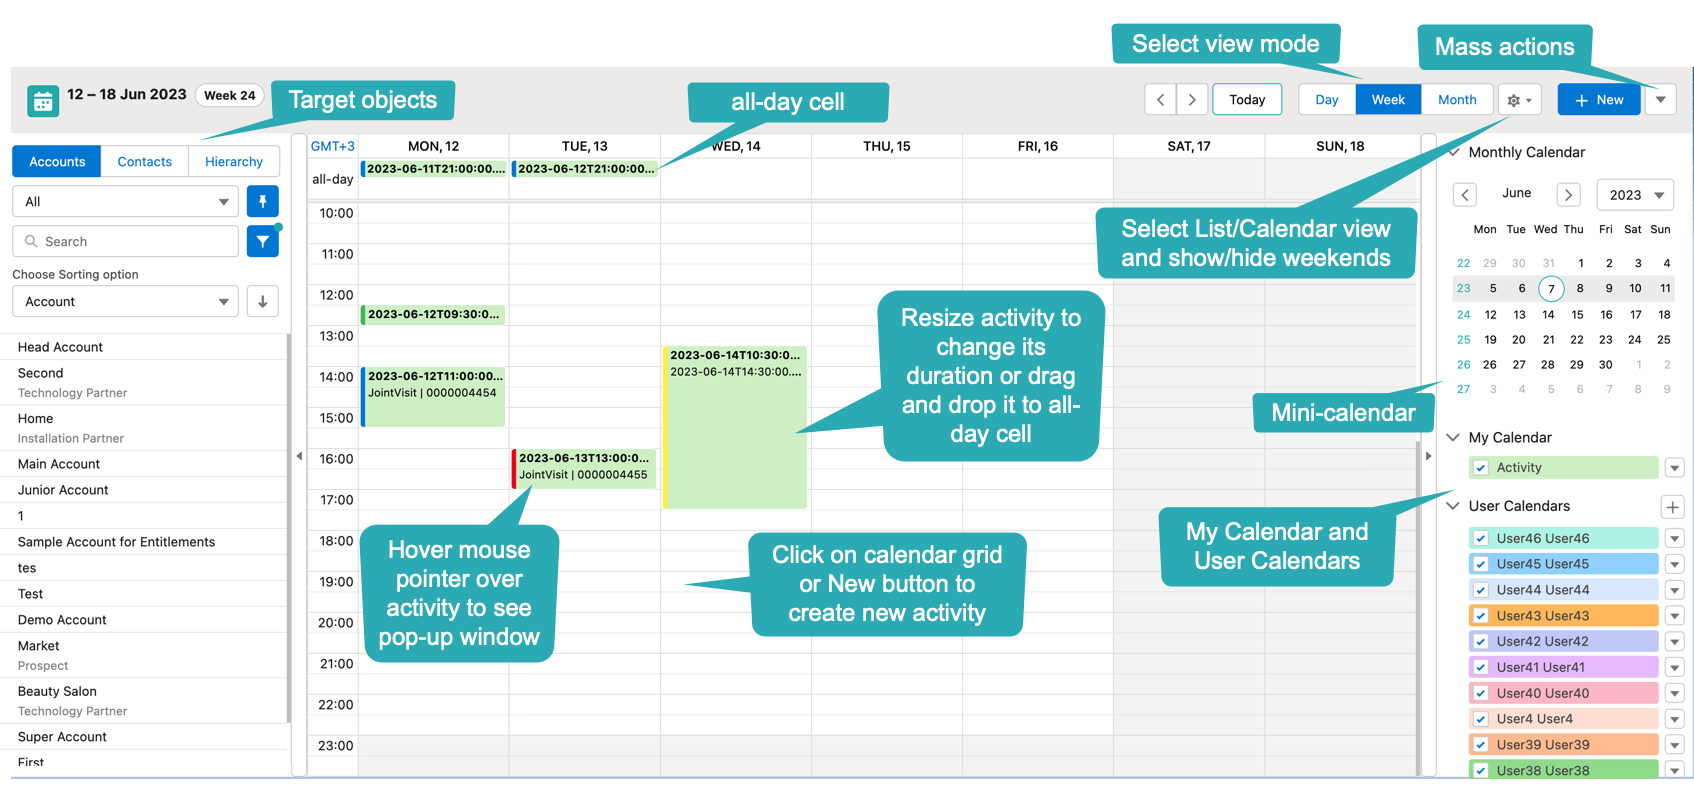
Main Calendar Area
On the main calendar area:
-
Switch between Day, Week and Month views. You can set the default view in the Pharma Calendar Settings.
-
Click Today to go to the current day.
-
Click
 to switch between Calendar view and List view, and show/hide weekends.
 -
Activities have color stripes on the left side according to their statuses. You can configure them in the Pharma Calendar Settings.
-
Activities can have titles and subtitles, you can configure them in the Pharma Calendar Settings.
|
Right Sidebar
-
Use the mini-calendar to quickly move to the desired date. The today date is always highlighted.
-
In the My Calendar section:
-
To hide your activities, unselect the checkbox. Your activities have their own color on the calendar grid.
-
To show only your activities, click
 and select Show only this.
-
-
In the User Calendar section:
To access this section, assign required custom permissions to the current user: Read Access To Other User Calendar to view other user’s activities in the calendar grid, and Full Access To Other User Calendar to edit other user’s activities. -
Select desired users' records to show on the calendar. Each user’s activities have their own color on the calendar grid.
-
To show only the desired user’s records, click
and select Show only this. -
To add an activity to the selected user’s calendar, click
and select Add Activity. -
To remove the user’s calendar from the list, click
and select Delete. -
To add a new user’s calendar:
-
Click
 .
. -
Select a user from the list. You can see only users that are available for you according to the Sharing Settings.
-
Click Add.
-
-
-
Click
 and
and  to hide and show any section of the right sidebar.
 -
Click
and to hide and show the right sidebar.
Actions with Activities
|
Any actions with activities (moving, resizing to change activity duration, changing status etc.) apply to database immediately. However, the Edit Activity form may display the obsolete data for a couple of minutes. |
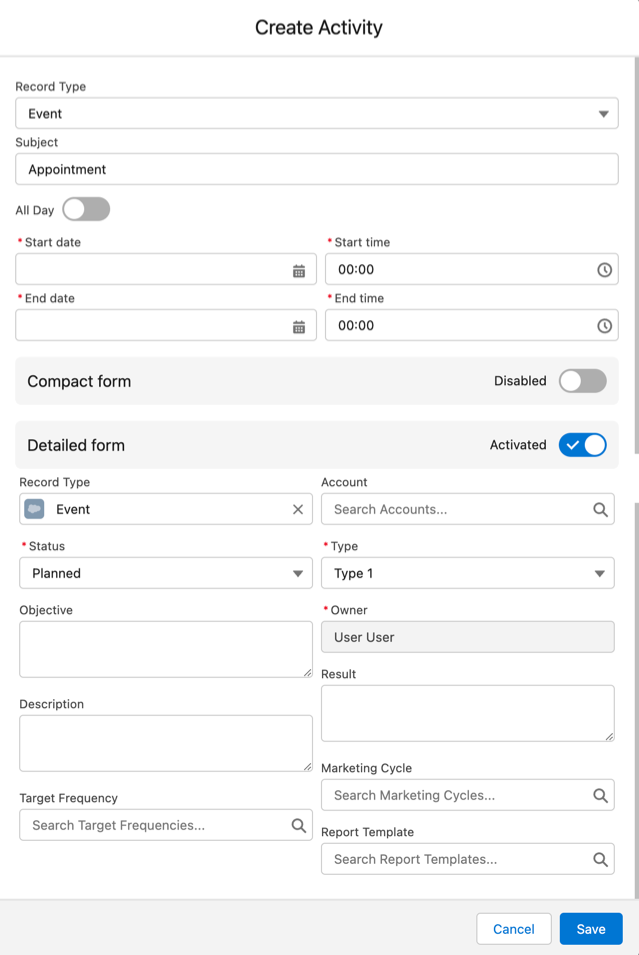
Creating Activities
Create an Activity by click
-
Click New or any blank cell to create a new activity. The Create Activity form will be opened:
-
Fill out the fields:
-
Record type: select record type created on the CTPHARMA__Activity__c object.
-
Enter Subject if needed.
-
Specify Start/End Time/Date or toggle All-Day. If you are creating an activity by clicking on a blank cell of the calendar, Start Time and End Time will be pre-filled according to the Default duration setting.
-
If needed, toggle Compact form or Detailed form and fill out their fields:
-
Compact form can be configured in Pharma Calendar Settings and can contain up to 10 fields of the record type, within you are creating the activity.
-
Detailed form displays all the fields of the record type, within you are creating the activity. It cannot be enabled, if the Compact form is already enabled.
Detailed form and Compact form cannot be enabled both at the same time. If you fill out one of these forms and switch to another one, all the entered data will be lost.
-
-
-
Click Save.
Create an Activity by drag and drop
You can also create an activity by dragging and dropping a Target Object from the left sidebar, the creation form will look different and will have another set of fields.
-
If you drag and drop from a single target object (for example, Account or Contact), lookup fields of this object will be filled in.
-
If you drag and drop from the Hierarchy tab:
-
Parent object: lookup fields of the parent object will be filled in.
-
Child object: lookup fields of the parent and child objects will be filled in.
-
-
You can select several target objects and drag and drop them. In this case, you can select only type of activity and edit properties of the created activities later. Activities will be created with the specified Interval between drag and drops.
-
Start Date and End Date are pre-filled according to the Default duration setting.
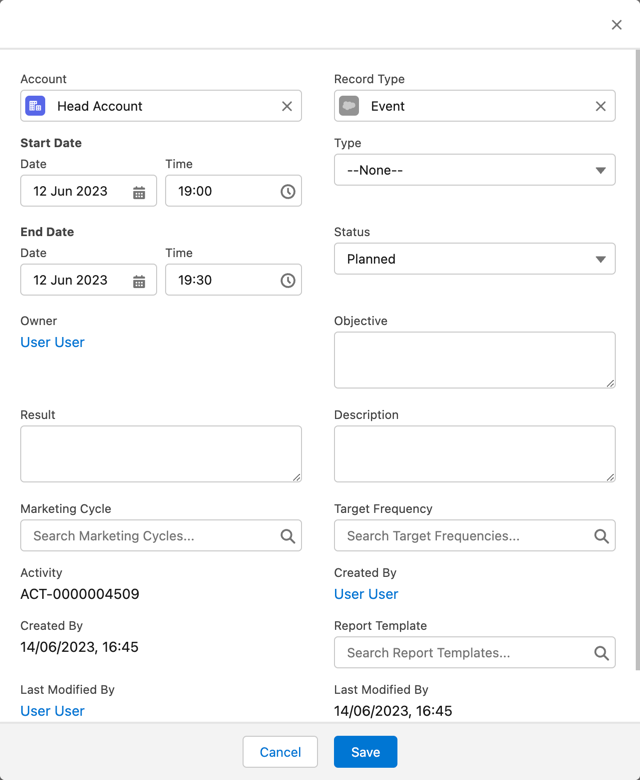
Editing Activities
-
To edit an activity, you can:
-
Click on activity in the calendar grid.
-
Hover mouse pointer over activity and click Edit on the pop-up (if it is enabled in the settings).
-
The activity form shown above will be displayed. . Edit necessary fields and click Save to apply changes.
To quickly change the status of an activity, hover the mouse pointer over the activity and select another Status.
-
Double-click on activity or click
 in the pop-up window to open it in the new browser tab:
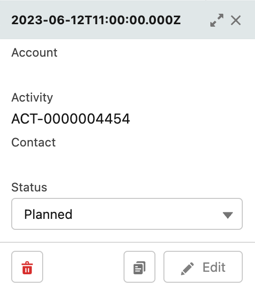
Editing other users' activities require the Full Access To Other User Calendar custom permission.
Moving and Copying Activities
-
To copy an activity, hover mouse pointer over an activity and click
 .
. -
To move an activity, do one of these:
-
click on it and specify another date/time;
-
drag and drop it to another calendar cell.
-
To copy or move multiple activities (applies only to the current user’s activities):
-
Click
 next to the New button on the right sidebar.
 -
Select Copy or Move.
-
In the dialog window:
-
Select Period of time: Day or Week.
-
Select day or week to move. If you select any day for the Week period, the first day of the week will be selected automatically.
-
Select target day or week. If you select any day for the Week period, the first day of the week will be selected automatically.
-
Click Move or Copy.

-
Deleting Activities
To delete an activity, hover mouse pointer over it and click ![]() .
.
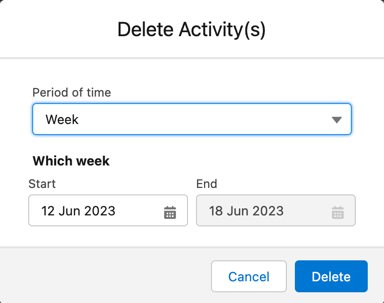
To delete multiple activities (applies only to the current user’s activities):
-
Click
next to the New button on the right sidebar. -
Select Delete.
-
In the dialog window:
-
Select Period of time: Day or Week.
-
Select day or week to delete. If you select any day for the Week period, the first day of the week will be selected automatically.
-
Click Delete.
-