Pharma Calendar Settings
Go to the Pharma Calendar Settings to set up the Pharma Calendar. If you cannot see this tab, add it to the panel.
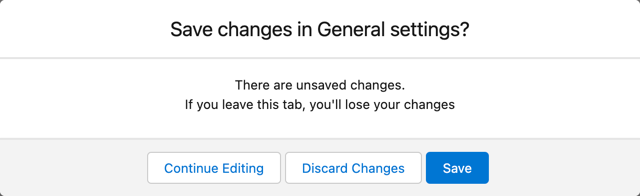
After editing settings on any tab, click Save to apply them. If you do not save changes and switch to another tab, the dialog window with further actions will be displayed:
User Division
| All Pharma Calendar settings are applied to the selected User Division. Please pay attention to which division is selected before modifying settings. |
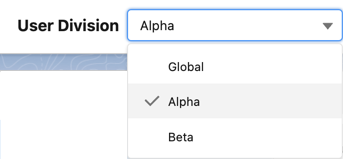
Before editing settings, select User Division from the list:
-
By default, Alpha and Beta divisions are included in the CT Pharma package. You can create your own divisions.
-
Select Global to apply settings to all users, which do not belong to any divisions.
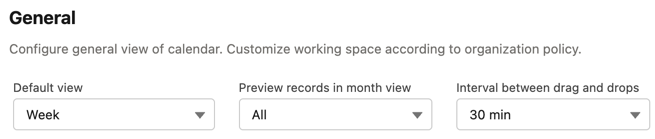
General
In this section, you can set up:
-
Default view:
-
Day
-
Work Week
-
Week
-
Work Month
-
Month
-
-
Preview records in month view (from 2 to 5 or All). It affects how many records will be displayed as preview for 1 day in Month view:
-
Interval between drag and drops:
-
30 min
-
1 hour
-
1 hour 30 min
-
2 hours
This setting affects the default interval between activities created by drag-and-drop of target objects from the left panel.
-
Click Save to apply changes on this tab.
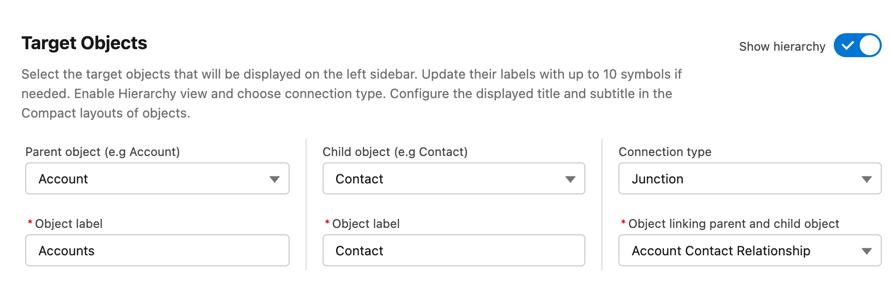
Target Objects
|
Editing the Parent Object and Child object fields requires the Allow to delete Pharma Calendar Setting records custom permission. |
In this section, you can set up target objects that will be displayed on the left sidebar of the calendar:
-
Parent object (Account by default) and Child object (Contact by default). If you want to specify another objects as a parent and/or child object, do the following:
-
Create lookup fields to the new parent/child object on the CTPHARMA_Activity__c object.
-
Select new object(s) in the Target Objects section.
-
Select created lookup fields to the new parent/child object in the Activity Objects section.
-
(Optional) edit settings in the Target Objects tab of the Pop-Up section.
-
-
Object label defines how the names of parent and child objects tabs in the left sidebar (10 symbols max).
-
Show hierarchy activates the Hierarchy tab in the left sidebar of the calendar. Then select the Connection type:
-
Direct: lookup from child object to parent object. Select lookup field from the Lookup from child object list.
-
Junction: when child object and parent object are connected via another object, which has lookup/master-detail fields related to both objects. Select lookup field from the Object linking parent and child object list.
-
Click Save to apply changes on this tab.
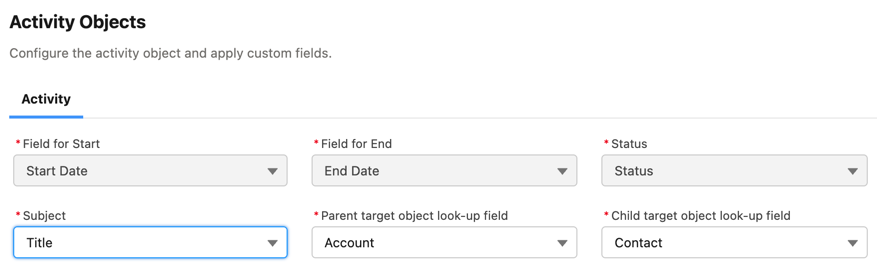
Activity Objects
In this section, select parent and child objects lookup fields, if target objects are not set as default (Account and Contact).
In the Subject list, select a text field to store value from the Subject field of the Create Activity form.
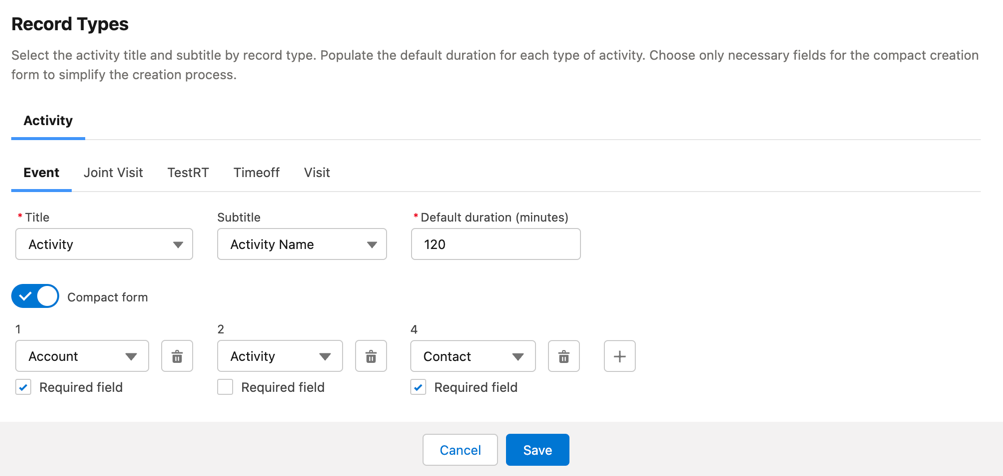
Record Types
In this section, you can set up record types, created on the CTPHARMA__Activity__c object:
-
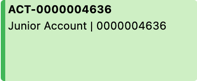
Title (required) and Subtitle (optional) are fields which values are displayed on the activity preview in the calendar grid:
-
Default duration (minutes): default value between Start Time and End Time for new activities (from 15 to 780 minutes).
-
Compact form toggle enables the set of additional fields for the Create Activity form:
-
Select a field from the list.
-
Check Required field if necessary.
-
Click
 to add one more field. You can add up to 10 fields.
 -
Click
 to remove the field.
You do not need to add Start Date, End Date, AllDay and Record Type ID fields, because they are displayed on the Create Activity by default.
-
If you disable and enable the toggle, your set of fields will be saved.
Click Save to apply changes on this tab.
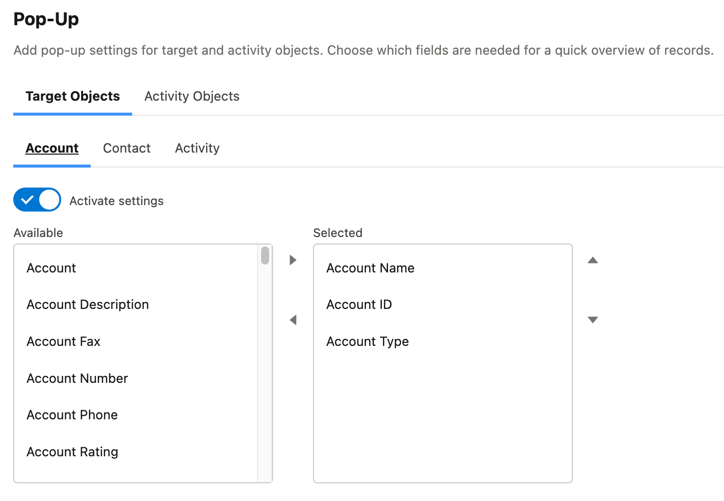
Pop-Up
In this section, you can turn on/off pop-ups for target objects (on the left sidebar) and activity objects (in the calendar grid).
-
Select the appropriate tab, Target objects or Activity objects.
-
For Target Objects, also select a tab for defined target objects (Account and Contact by default).
-
If the hierarchy is enabled and connection type is Junction, also an additional tab of the linking object will be displayed (Activity in the example below). On this tab, you can select fields to show in the pop-up for the target objects in the Hierarchy tab.
-
If the hierarchy is enabled and connection type is Direct, then the pop-up for the target objects in the Hierarchy tab will display fields specified for the child object (Contact in the example below).
-
-
Move desired fields from Available to Selected (up to 5): values of these fields will be displayed on the pop-up.
For Activity Objects, you do not need to add the Status field, because it is displayed on the pop-up by default.
Click Save to apply changes on this tab.
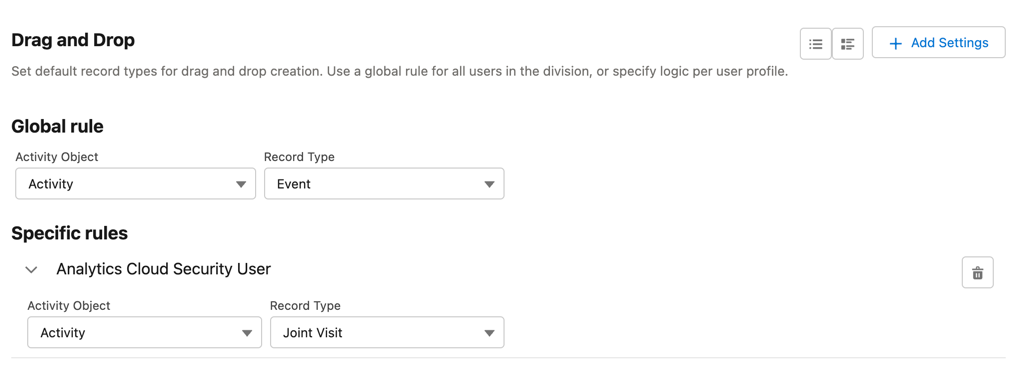
Drag and Drop
In this section, you can set up default record types for drag-and-drop creation of activities. If default record typers are not set, then the Create Activity form will be opened after dragging and dropping an object from the left sidebar to the calendar grid. You can specify drag-and-drop settings globally for all users of the selected division, or for a specific user profile. Settings for a specific user profile have higher priority than global settings.
-
To set default record types for all users of the selected division, in the Global rule section select desired values from the Activity and Record Type lists.
-
To set default record types for a specific user profile, click Add Settings:
-
Select User Profile.
-
Select Activity Object.
-
Select Record Type.
-
Click Save.
-
Click ![]() to remove settings for a specific user profile.
to remove settings for a specific user profile.
|
This action requires the Allow to delete Pharma Calendar Setting records custom permission. |
Click Save to apply changes on this tab.
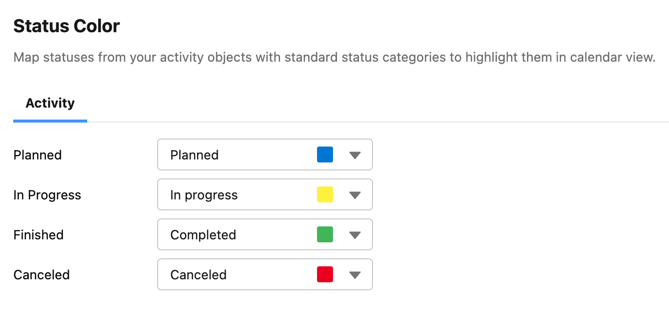
Visualization → Status Color
In this section, you can map status from your activity objects with standard status categories, each of them has its own color. It affects the color of the stripe on the left side of the activity preview:
There are 4 categories:
-
Planned
-
In Progress
-
Finished
-
Cancelled
You can define the same category for different statuses, or leave any status without category.
Click Save to apply changes on this tab.
You can also create your own statuses and map them with categories. To do that:
-
Go to Setup → Object Manager and search for the CTPHARMA__Activity__c object.
-
Go to Fields & Relationships and click on the Status picklist.
-
In the Values section, click Edit for existing statues. To create a new status:
-
Click New.
-
In the text box, type the status name.
-
Select record types, for which the status must be applied.
-
Click Save.
-