Working with Files for Offline Objects
|
In the Files section of an offline object record, you can attach files and photos directly to relevant records from your device, and instantly send files to clients directly from the mobile application.
Supported file formats
-
Microsoft Word (.doc, .docx)
-
Microsoft Excel (.xls, .xlsx)
-
Microsoft PowerPoint (.ppt, .pptx)
-
Adobe PDF (.pdf)
-
Plain Text (.txt)
-
Rich Text Format (.rtf)
-
Image Formats (.jpeg, .png, .gif, .bmp)
-
Audio Formats (.mp3, .wma)
-
Video Formats (.mp4, .mov)
Prerequisites
To be able to attach files to offline objects in the Files section, check the following settings:
-
Go to Setup → Salesforce Files → General Settings and click Edit.
-
Select the Files uploaded to the Attachments related list on records are uploaded as Salesforce Files, not as attachments checkbox and click Save.
Also, check that the offline objects to which you want to attach files have necessary permissions:
-
In CT Mobile Control Panel
-
In CT Mobile Control Panel 2.0
-
Select the offline object to which you want to attach files.
-
On the right side, enable Create Allowed and Delete Allowed permissions for the Note, Attachment, Google Doc And File related list.
-
Click Save.
-
Select the offline object to which you want to attach files.
-
On the Related Lists tab, enable Create Allowed and Delete Allowed permissions for the Files related list.
-
Click Save.
Setting up download option for attached files: entire file or a preview
Save time for online synchronization: choose between downloading the entire file for offline use or a quick preview:
-
In CTM Settings
-
In CT Mobile Control Panel 2.0
-
Go to CTM Settings.
-
Select an existing Offline Object record or create a new one.
-
Select the desired value for the Files Downloading Mode picklist:
-
Skip Download (default): files will not be downloaded.
-
Download As Preview: only preview images will be downloaded. Tap on the preview image to download the entire file.
-
Full Size: the entire file will be downloaded.
-
-
Click Save.
-
Select the offline object to which you want to attach files.
-
On the Main tab, select an option for the Files Downloading Mode:
-
Skip Download (default): files will be downloaded during the fast sync, and will not be downloaded during the full sync.
-
Download As Preview: only preview images will be downloaded. Tap on the preview image to download the entire file.
-
Full Size: the entire file will be downloaded.
-
Setting up date-based filtering during the upload process
Save time by uploading only necessary files through date-based filtering during the upload process:
-
Go to CTM Settings.
-
Select an existing Offline Object record or create a new one.
-
In the Files Filter field, specify the latest date of the offline object creation that should be downloaded during the sync. The filter condition is:
SystemModStamp > date. For example, to specify the 31st August 2023 as the latest creation date of the downloadable offline object: SystemModStamp > 2023-31-08T00:00:00Z.
-
Click Save.
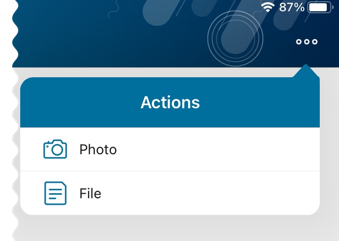
Attaching files to an offline object
To attach a file in the Files section:
-
Open the record to which you want to attach the file(s).
-
In the Actions menu, tap File.
-
Select file(s) from your device and tap Open.
The record’s main screen is open. Go to the Files section of the record and perform quick record synchronization to update the record in Salesforce.
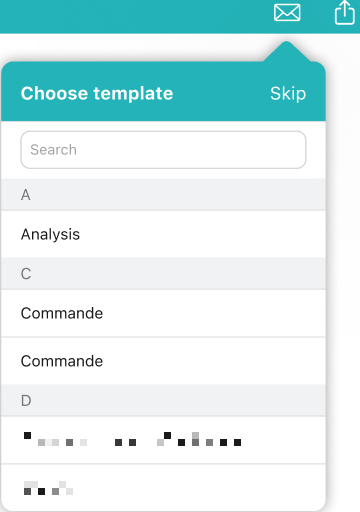
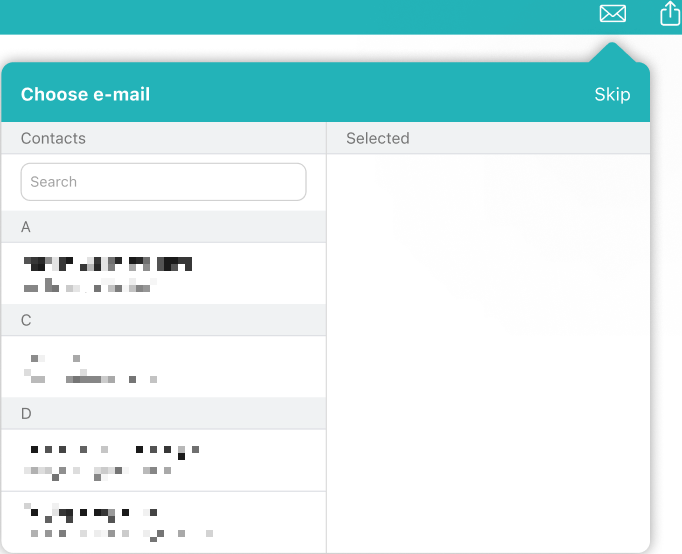
Sharing a File
To share a file, select it in the Files section and do the following:
To share by standard iOS sharing dialog window, tap ![]() .
.
To share by sending email:
-
Tap
 .
. -
(Optional) select an Email template, or tap Skip.
-
(Optional) select a contact from the list, or tap Skip:
You can send an email only to contacts who have a specified email address in Salesforce. Also, if you are sending email from a record that has lookup to an Account or Retail Store record, you will see only contacts related to this Account or Retail Store. -
fill out the standard Email field for the desired Contact record;
-
if you use Person Accounts, fill out the standard Email field for the desired Person Account record.
-
-
Tap iOS Mail to send the file using standard iOS mail client, or tap Other apps to open the standard iOS sharing dialog window. Select the desired way to share the file.
You can send an email using a third-party mail client (like Microsoft Outlook), if it is set as default in your iOS settings. In this case:
-
The recipient’s address will not be inserted automatically, but will be copied to clipboard. Please paste it manually.
-
The subject string will be duplicated in the message body.
-