Working with CT Vision IR in the CT Mobile app
To work with CT Vision in the CT Mobile app:
-
Log in to the CT Mobile app.
In the CT Mobile app, a sales representative:
-
takes photos of the shelves in the stores,
-
checks the status of the recognized photos,
-
verifies the recognized products,
-
clarifies the number of the products on the shelves,
-
adds photo tags to filter photos if needed.
Take a Photo of a Product Shelf
|
If the Enable Simple View option is enabled, the header with the report data (the actual and planned number of photos, the number of errors, and the actual number of the required report summaries) and the final summary report will not be displayed. Also, previewing pictures in full size will be disabled. |
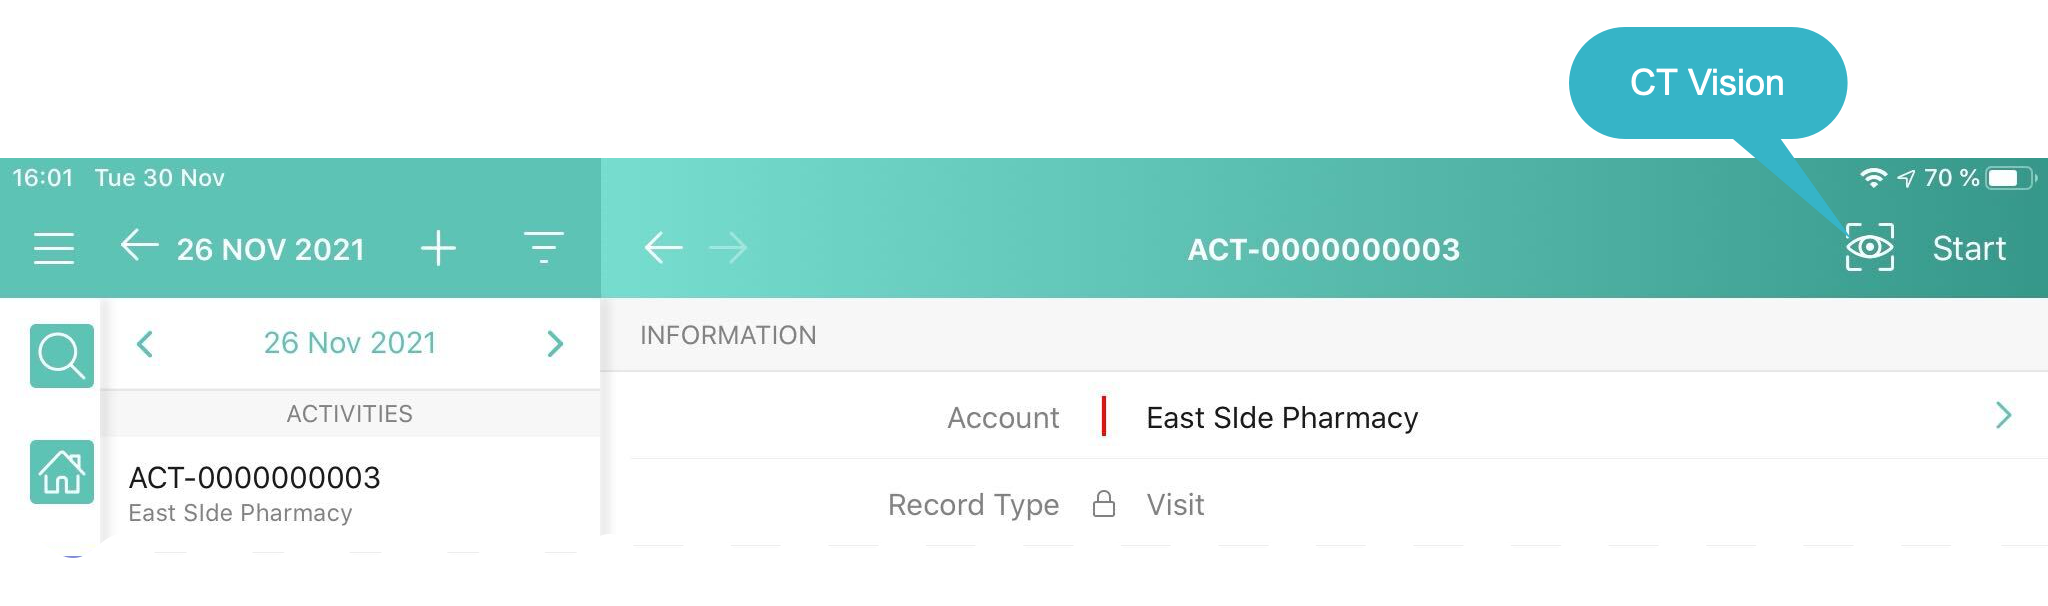
To take a photo of the shelf:
-
Open an Activity record in the CT Mobile app and tap the CT Vision icon.
-
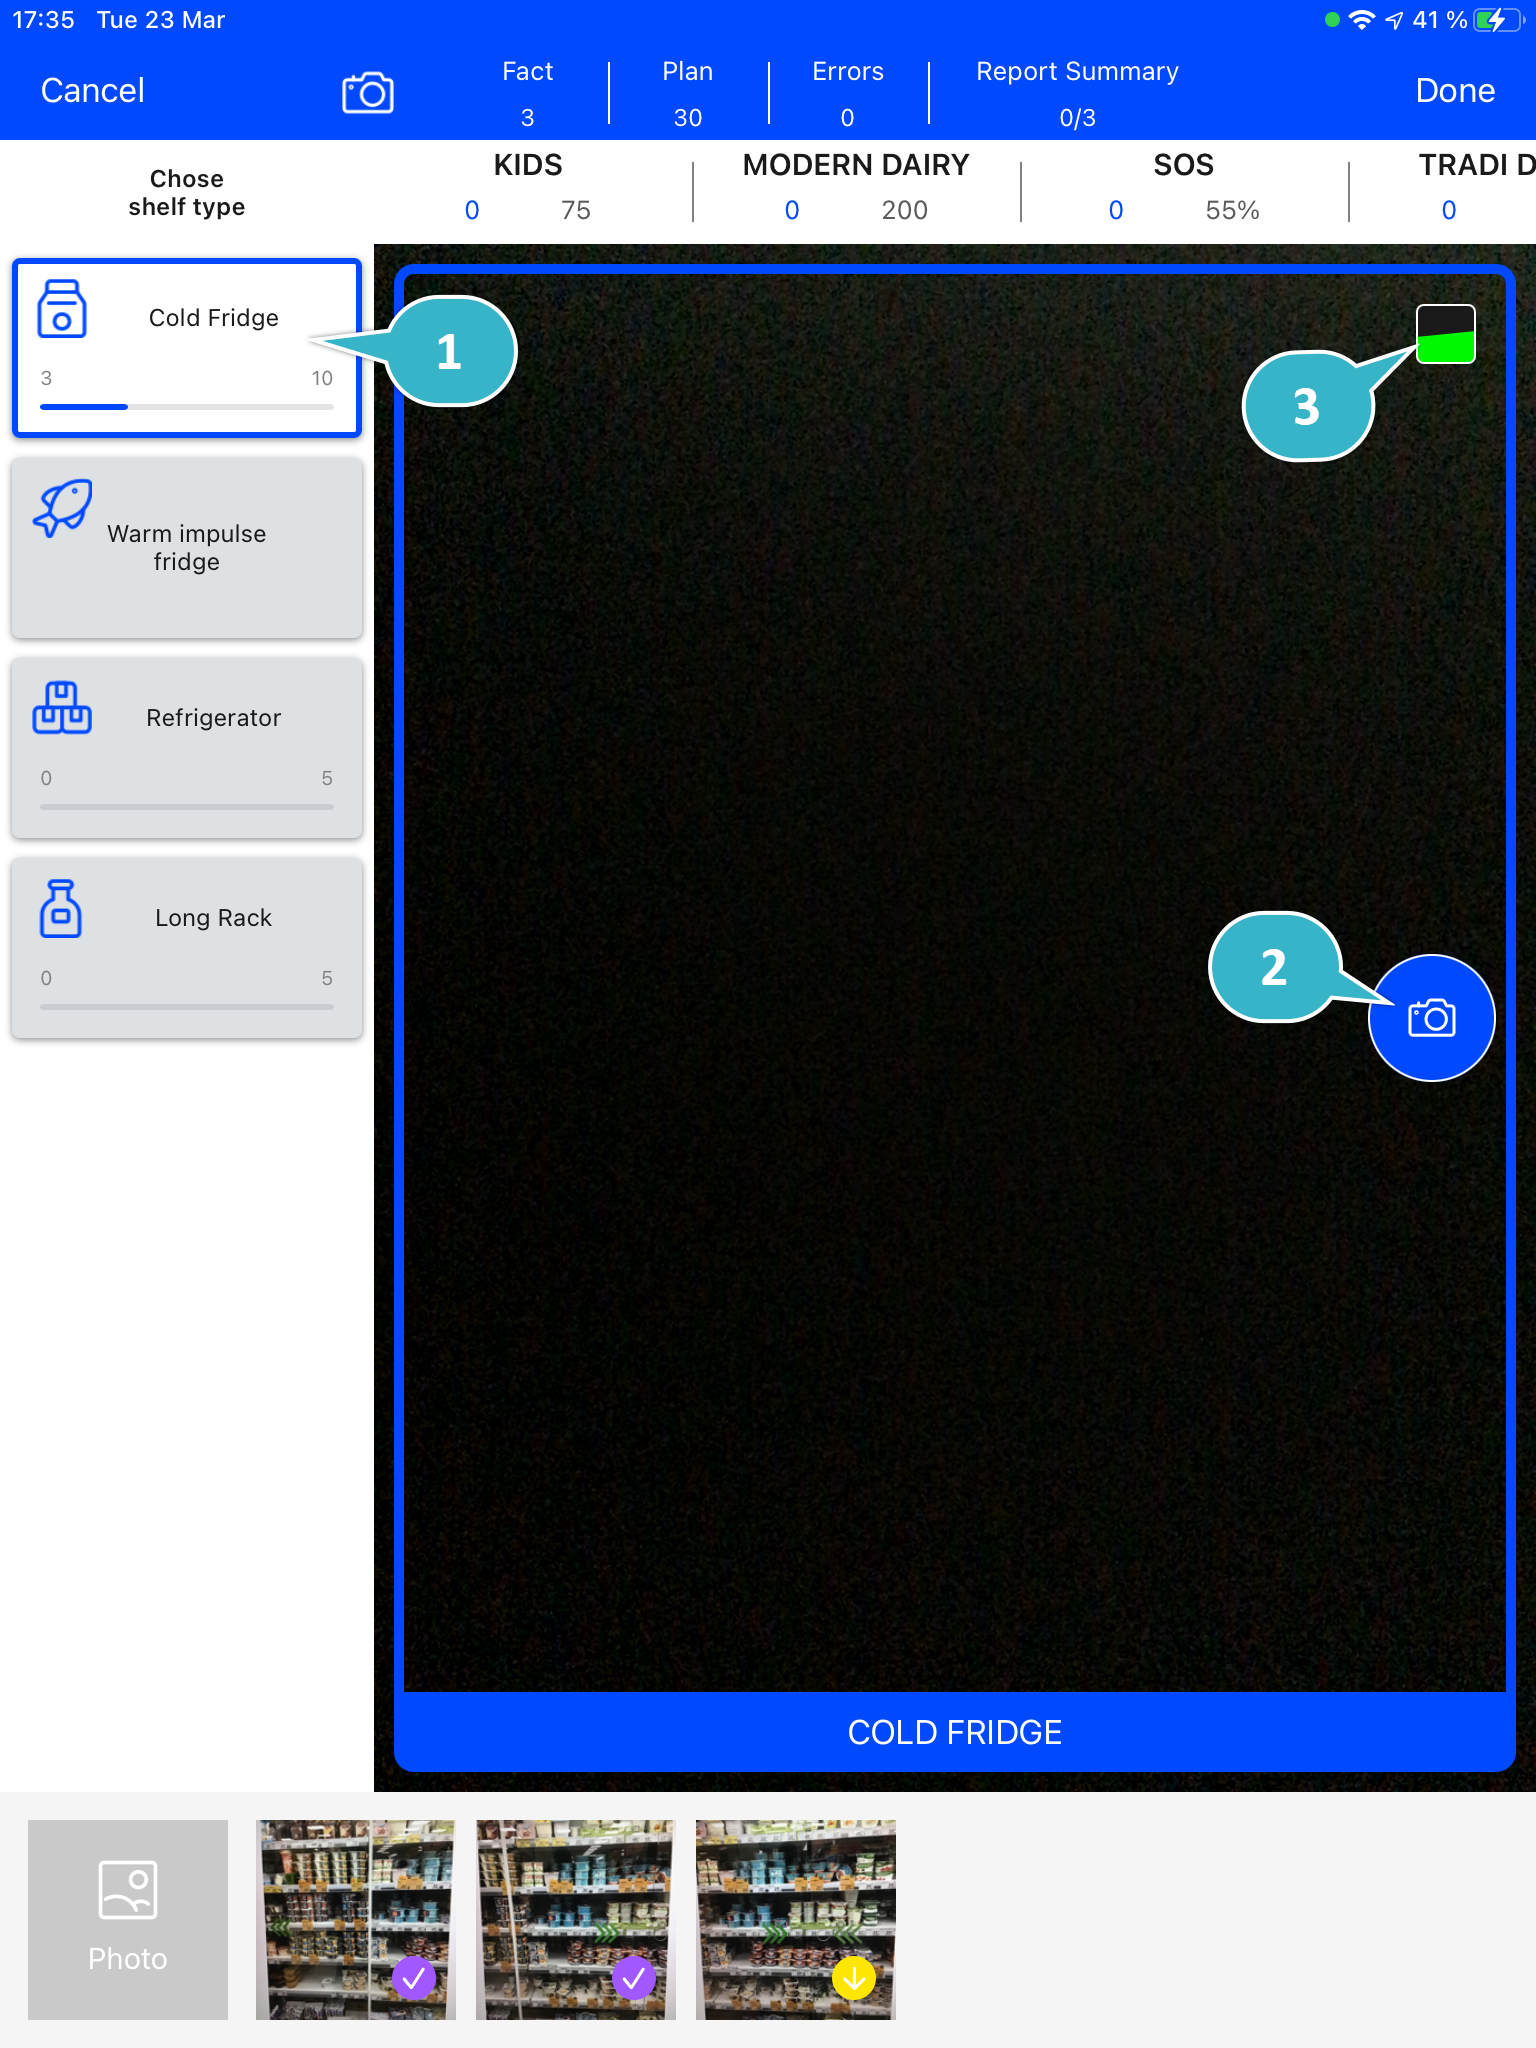
Select the shelf type on the left side of the screen.
If there are no Vision Shelf records, no shelf types will be displayed.
-
Point the tablet at the desired shelf and tap the Photo button.
-
The Photo button is active when the indicator that displays the position of a device relative to the horizon is green:
-
 : the device is tilted.
 -
 : the device is aligned with the horizon.
-
-
Hints for the selected shelf will be displayed at the bottom of the screen or in the pop-up.
For more information, refer to Vision Hint Field Reference.
-
-
Take a photo of the shelf.
-
Use the Photo type to create a photo of the shelf.
-
Retake the photo when the warning indicates that the image quality is not satisfactory.
-
If the photo size is more than 2.5 MB, the photo will be compressed.
-
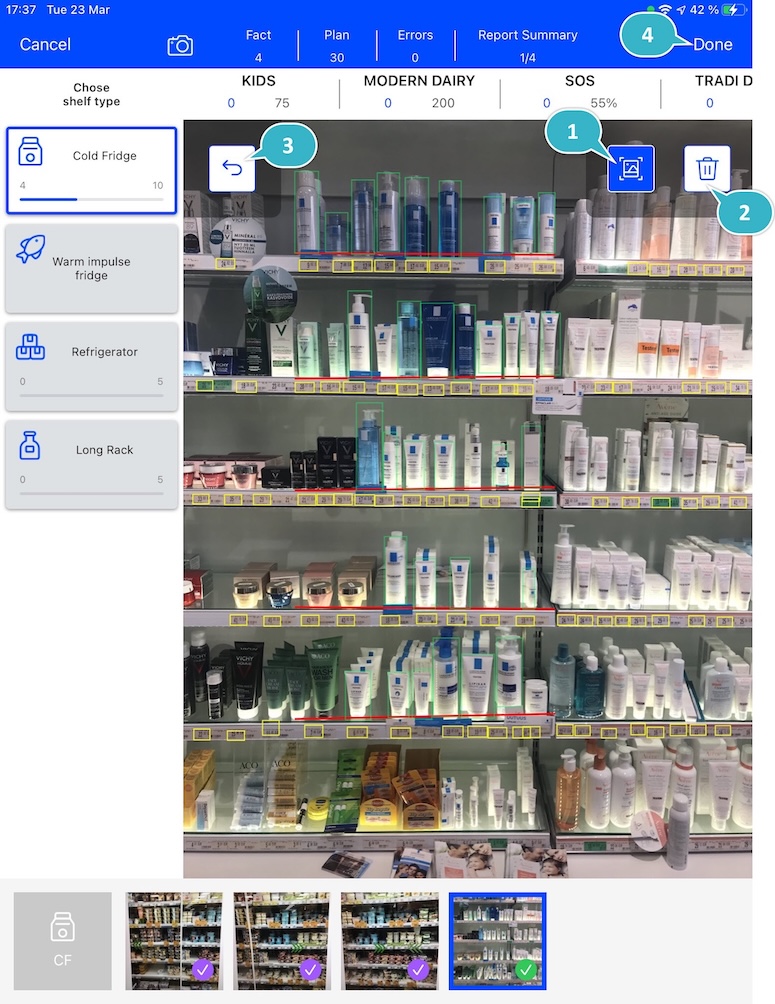
The actual and planned number of photos, the number of errors, and the actual number of the required report summaries are displayed on the header of the screen.
When an indicator (3) is green, tap the Photo button (2) for the selected shelf (1).
-
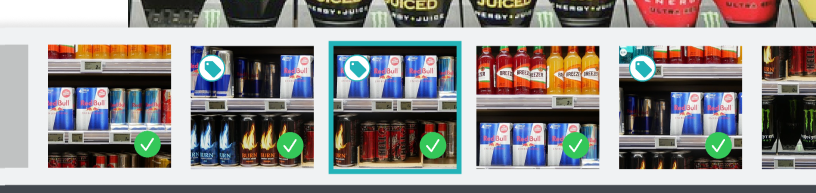
The taken photo will be displayed in the Miniatures gallery at the bottom of the screen.
-
The photo is sent for recognition and the appropriate status indicator is displayed on the photo in the Miniatures gallery.
-
-
-
If Enable Gallery = true, add photos from the device gallery by tapping the Add Photo button (4). Select up to 9 photos and tap Done.
-
Repeat steps 4–5 to take the planned number of photos for the current visit.
-
If needed, manage errors and products:
-
Review products with the clickable realogram.
-
On the Shelf Product List, add shelves, unrecognized products, and/or correct the amount of product on the shelf.
-
Manage errors according to the status indicator on the photo in the Miniatures gallery.
-
Manage photo tags.
-
-
Tap Done (4) to open the Report Summary.
Status Indicator
The statuses can acquire the following values:
| Status | Description |
|---|---|
Yellow (arrow up) |
The photo is being sent for recognition. |
Yellow (arrow down) |
The recognition result is being received. |
Red |
An error has occurred. |
Green |
Successfully recognized. |
Purple |
The photo is successfully recognized, but no required products are detected. |
Orange |
Displayed after the user confirms a photo with an error. |
The status indicator is displayed on the taken photo in the Miniatures gallery.
If an error occurred during photo processing, the status indicator changes to red. Tap on the miniature with the error to select further action:
-
Tap Confirm to confirm the photo with an error.
-
Tap Retake to delete the taken photo with an error and make a new photo.
-
Tap Delete to remove the taken photo. If the first photo has been deleted, the camera opens. Otherwise, the previous photo opens.
The photo will be deleted if the device has access to the Internet, as the photo is physically on the server.
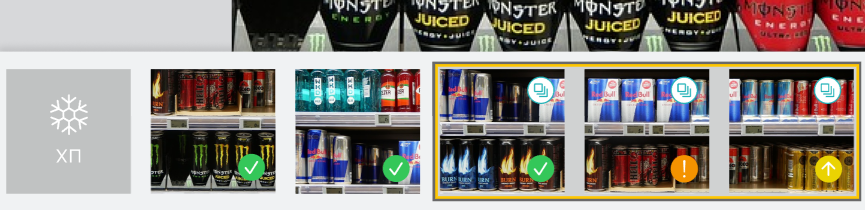
Image Recognition Tools
Review the taken photos and clarify the details of the recognized products.
Tap the desired photo in the Miniatures gallery to open it.
Clickable Realogram
To view the clickable realogram:
-
Tap the
 icon (1) on the photo to turn on the clickable realogram.
-
each shelf will be highlighted with a specific color, and the recognized products will be highlighted with the frame of another specific color.
-
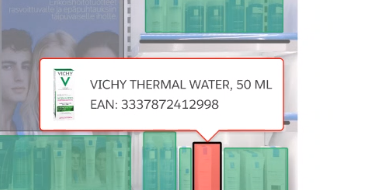
Tap the recognized product to see the details. The product previews are loaded from the CT Vision server.
-
tap the
 icon (2) to delete a photo.
 -
tap the
 icon (3) to go back to taking photo mode.
 -
tap Done (4) to open the Report Summary.
-
Shelf Product List
To view the Shelf Product list:
-
Tap the
 button.
 -
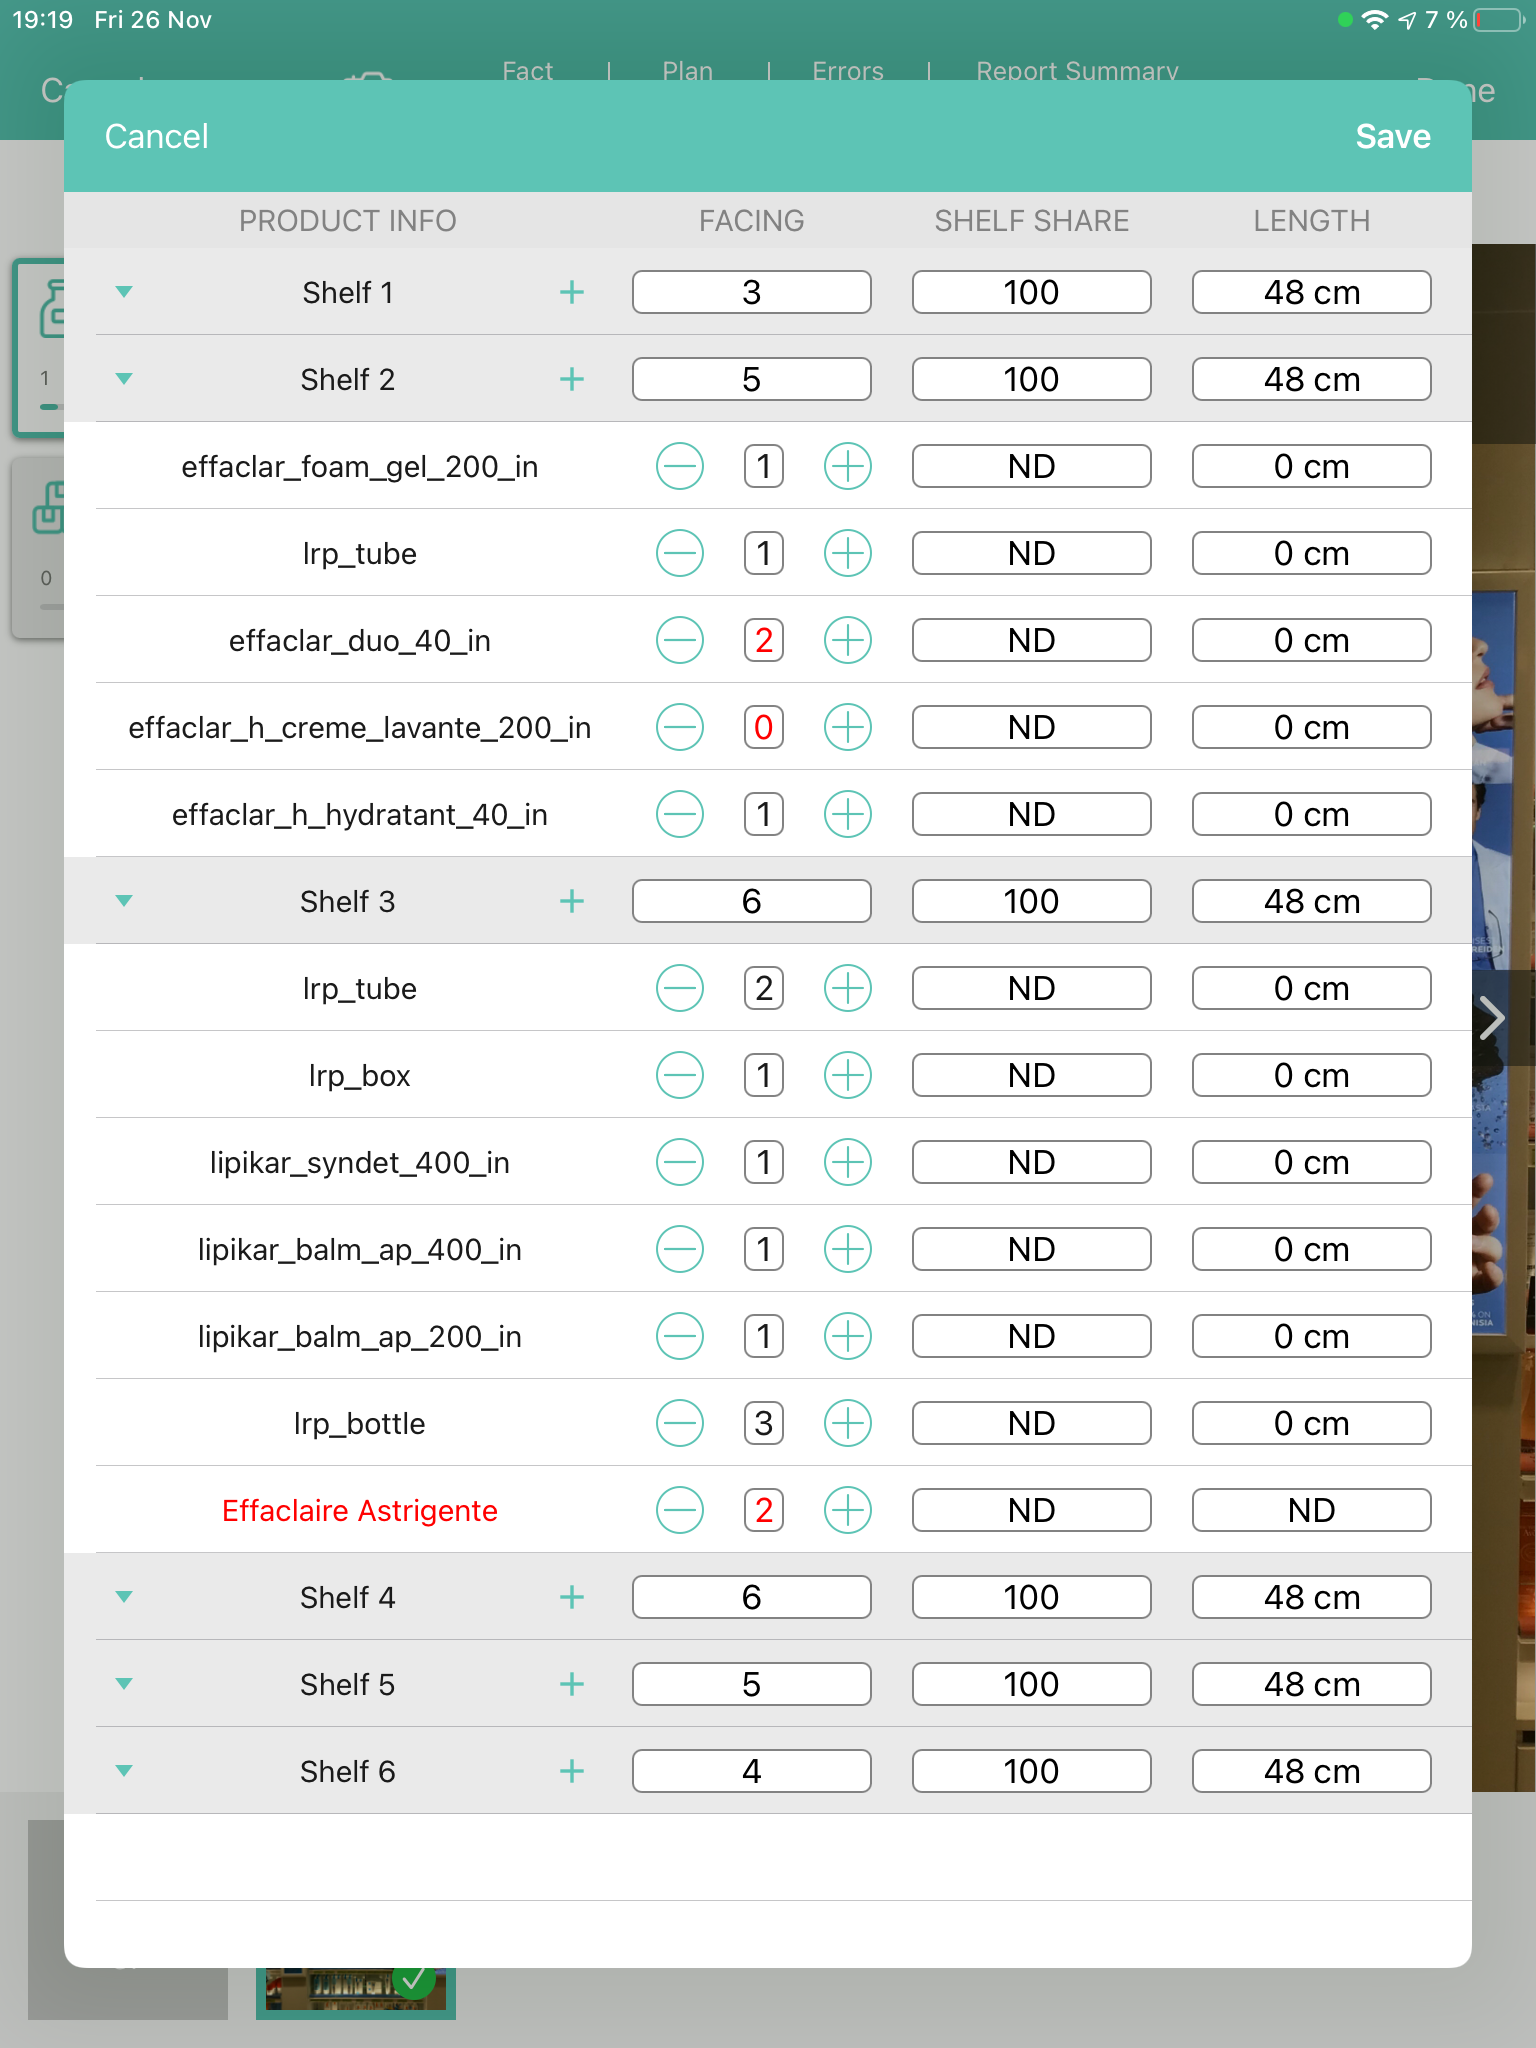
Review products on the shelves on the Shelf Product List screen:
-
In the Product Info column, tap the shelf name to expand the shelf and review products.
-
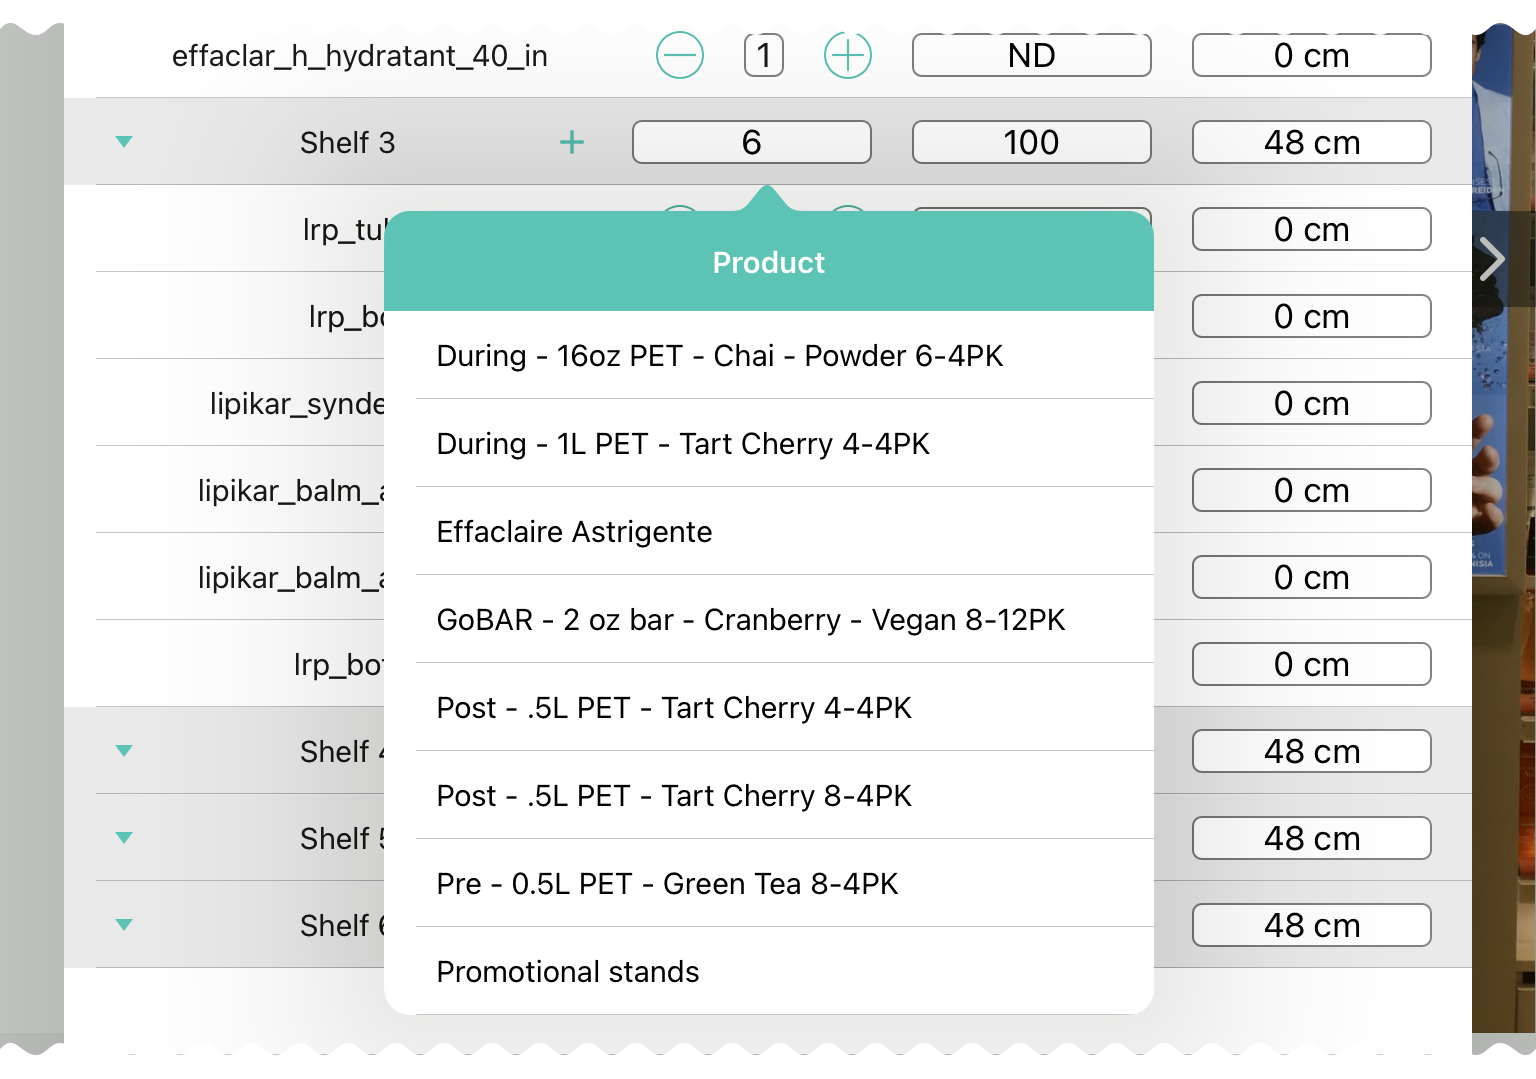
Tap the Plus button next to the desired shelf to add the unrecognized product. The product will be highlighted with a red color.
-
In the Facing column, change the number of the desired product, if necessary. The updated number will be highlighted in red color.
-
The Shelf Share and Length parameters are calculated per shelf, not per each product.
-
-
Tap Save.
Photo Tags
|
To enable photo tags for the CT Mobile application, add the Tag offline object in the CT Mobile Control Panel / CT Mobile Control Panel 2.0. |
If enabled, add a photo tag to the desired photos.
-
Tap a photo in the Miniatures gallery.
-
Click on the photo tag icon on the selected photo.
-
In the pop-up, tap to select tags from the list of available tags to add them to a photo.
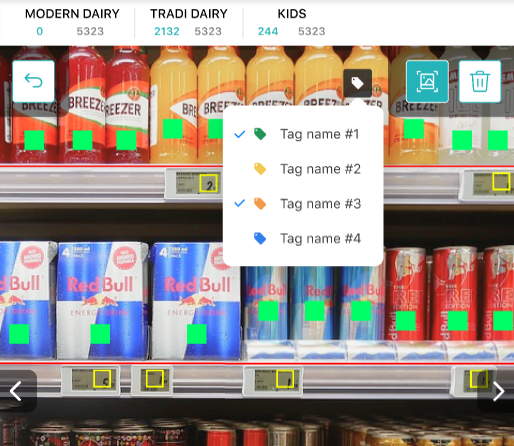
-
Click
to go back to taking photos.
The tag is added. In the Miniatures gallery, the photo tag icon is displayed on the photo.
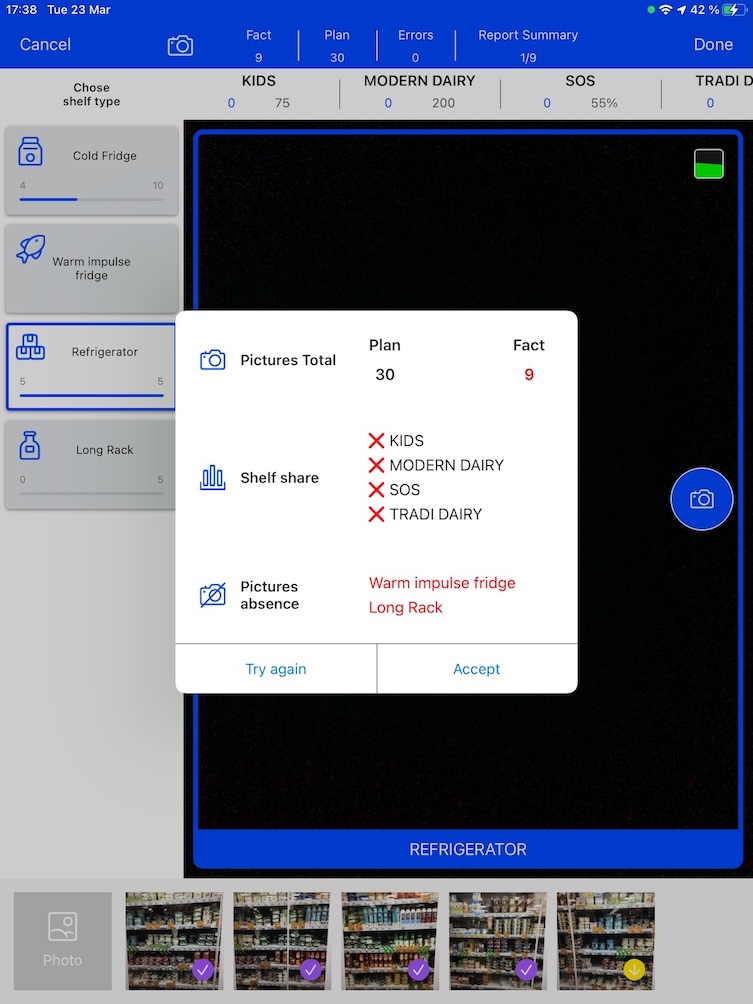
Create a Report Summary
-
Review the report:
-
In the Pictures Total, compare the planned and taken number of photos.
If there are no shelves or the planned number is not set, the planned number of photos is taken from the Plan field of the Vision Object record. Otherwise, the planned number is the sum of the values from the Plan field of the Vision Shelf records.
-
In the Pictures Absence, verify shelves, for which there is no photo or the actual number of photos is less than the number specified in the Plan field of the CTM Settings record with the Visit Shelf record type.
-
-
Tap Accept to save the report.
-
Tap Try again to go back to taking photos and managing errors.
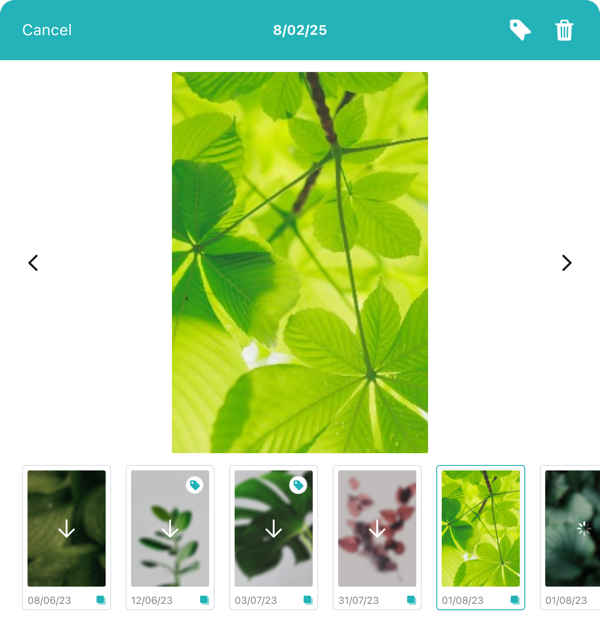
Pictures Gallery
|
Realogram view is not available while seeing photos in Picture Gallery. |
Add the Pictures gallery to the object (e.g., Account) mobile layout to view photos that you have taken.
-
In the case of many photos, scroll them horizontally.
-
Filter photos by dates and tags.
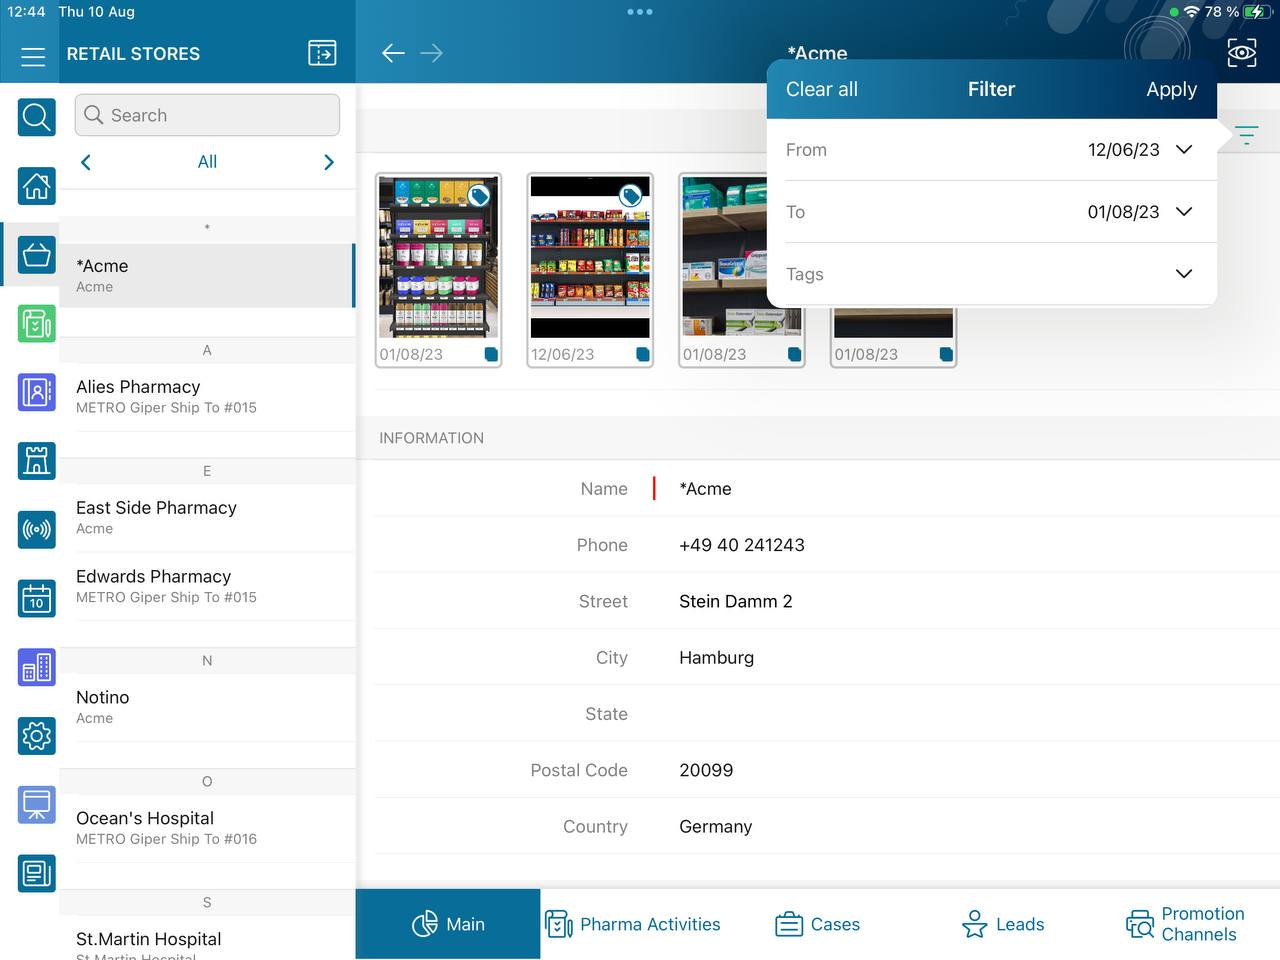
-
Tap the photo to open the gallery and view photos in a full size. This feature is disabled if the Enable Simple View option is turned on.
-
While viewing photos in a full size:
-
Tap the
 icon to see the photo tags.
Photo tags are displayed according to their object and/or its record type. For example, if a photo was created on the Account object, you will see only photo tags that are also created for the Account object. Or, if a photo was created on the Customer record type of the Account object, you will see only photo tags that are also created for the Customer record type. -
Tap
 to delete the photo.
This feature is available starting from version 3.0 of the CT Mobile iOS app.
-