7. Sign a Document: the CT Mobile app
Sign a Document with a Simple Signature
To sign documents with a simple signature, the Simple provider should be set for a template. One of the following options should be specified in the Signatory Type field on the template.
-
In the case of a Handwritten signature, add the signature manually in the signature pop-up.
-
In the case of Proof of Consent, select a photo from the device gallery or take a new one.
This type is currently unavailable for CT Mobile iOS users.
To sign a document:
-
Tap the object to sign in the left menu.
-
Select a record in the left record list.
-
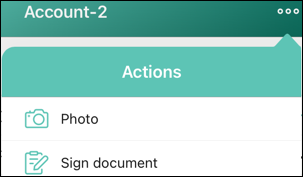
In the Actions menu, tap the Sign Document button.
-
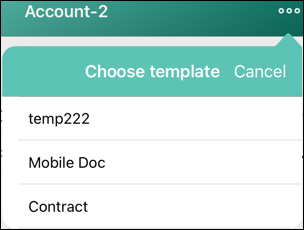
Select the required template from the list.
-
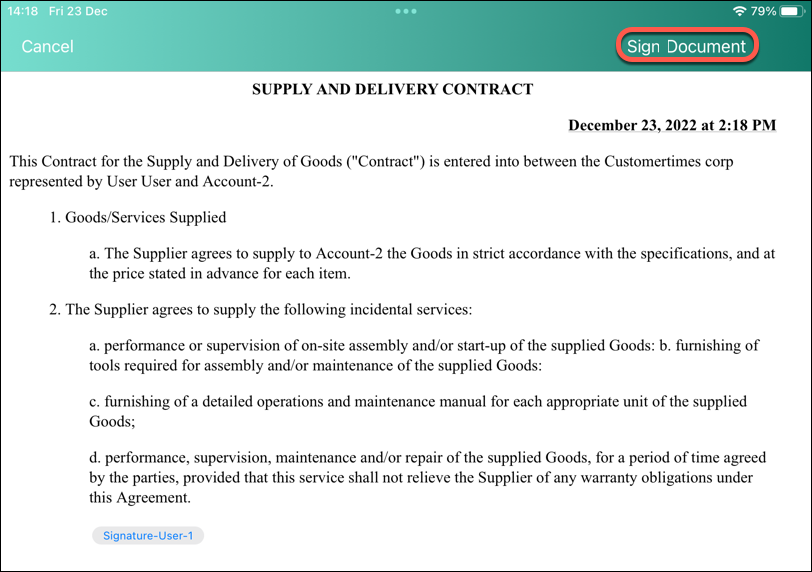
In the open template, tap the Signature button to sign a document. In the case of several signatories, each of them should do one of the following actions:
-
manually add a signature in the corresponding pop-up;
-
select a photo with the signature from the device gallery;
-
take a photo with the signature.
-
-
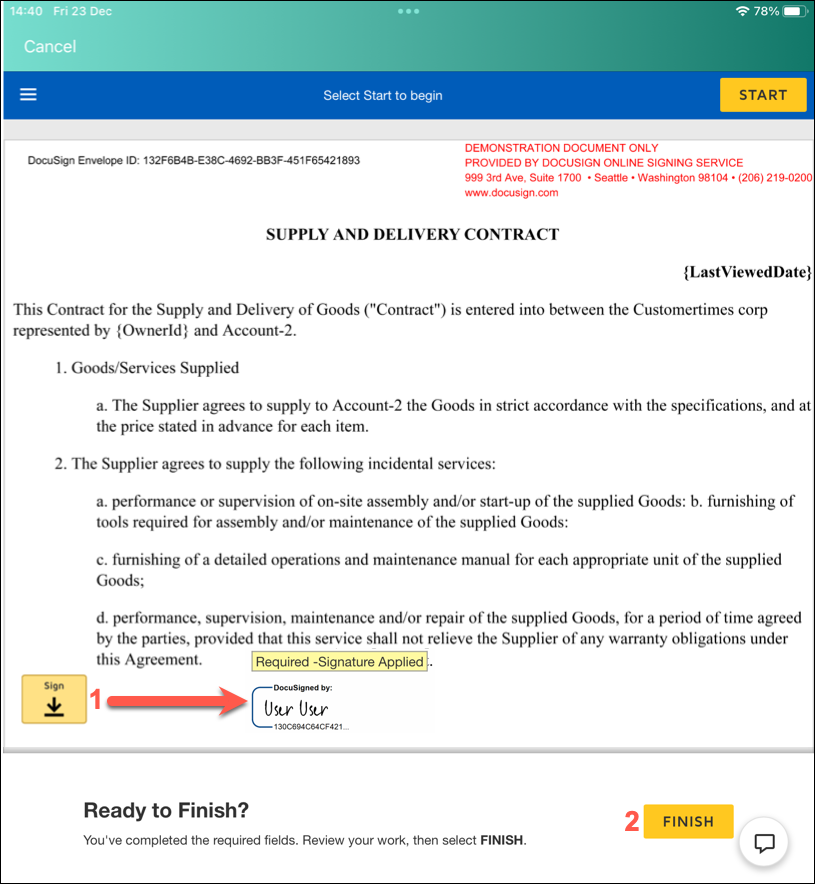
Click the Finish button.
The document is signed, and the confirmation is displayed.
-
The document will be successfully signed only when all required fields are filled out. All signatories should add their signatures to the template.
-
When a document is successfully signed, the Sign Document record with the Completed on device status is created. On the related Object record, the ContentVersion record with the generated PDF is created in the Files section.
The document may be generated based on a template without the Signature button(s). In this case, the finished document will also be saved in Files.
-
Learn more about records related to the Sign Document record.
Sign a Document with a Legally Binding Signature
|
Available for CT Mobile iOS users. |
Sign a Document on a Mobile Device
To sign documents with a legally binding signature, the DocuSign provider should be set for a template. The Device option should be selected in the Signatory Place field via adding the Signature button on the template.
To sign a document:
-
Tap the object to sign in the left menu.
-
Select a record in the left record list.
-
In the Actions menu, tap Sign Document.
-
Select the required template from the list.
-
In the opened template, tap the Signature button to select the signatory (if there are many).
-
Tap Sign Document.
-
If the authentication type was selected for the template, wait until the DocuSign Authentication window opens in the app-browser window. According to the authorization type, tap Send code or wait for the phone call.
-
Tap Continue, sign a document in the proper place, and click Finish.
The document is signed. The confirmation email is sent to the associated user(s) and the Sign Document record with the attached PDF is available in the CT Mobile app.
-
On the mobile device, perform the synchronization to send the Sign Document record to Salesforce.
-
In Salesforce, the signed PDF document will be attached to this record when all signers have signed the document.
-
On the mobile device, perform the synchronization to receive the Sign Document record with the attached signed PDF document.
Sharing the Signed Document
If needed, you can share the signed PDF file:
-
Select the file in the Files section. If you configured a lookup between the Sign Document object and a custom object:
-
Select a record of the custom object.
-
Tap Sign Documents tab and then Files Tab.
-
Select the signed document.
-
-
Tap
 icon.
icon. -
(Optional) select an Email template, if you want to use it for sharing the document by email. Otherwise, tap Skip.
-
(Optional) select a contact from the list. Please note, that:
-
You can send an email only to contacts who have a specified email address in Salesforce:
-
fill out the standard Email field for the desired Contact record;
-
if you use Person Accounts, fill out the standard Email field for the desired Person Account record.
-
-
You can send an email using a third-party mail client (like Microsoft Outlook), if it is set as default in your iOS settings. In this case:
-
The recipient’s address will not be inserted automatically, but will be copied to clipboard. Please paste it manually.
-
The subject string will be duplicated in the message body.
-
-
-
Tap Send. The standard iOS sharing dialog window will be opened. Select the desired way to share the file.
Sign a Document by Email
To sign documents with a legally binding signature, the DocuSign provider should be set for a template. The Email option should be selected in the Signatory Place field by adding the Signature button on the template.
To sign a document:
-
Tap the object to sign in the left menu.
-
Tap the desired record in the left record list.
-
In the Actions menu, tap the Sign Document button.
-
Select the required template from the list.
-
In the open template, tap the Signature button to select the signatory (if there are many).
-
Click the Sign Document button.
-
A signatory receives an email from DocuSign to review and sign a document.
-
According to the specified authorization type, a signatory may need to confirm his action by SMS or phone.
-
The document is signed. The confirmation email is sent to the associated user(s).
Handle Offline Flow
If there is no internet connection when a user signs a document, the request and the corresponding Sign Document record will be saved on the device and sent to Salesforce via the next synchronization.
-
The Batch_DocumentSender Apex class runs every 15 minutes and sends the corresponding request and record to Application Service to complete the signing. For versions 1.22 and later, the Apex job may not launch. To fix it:
-
Remove the Apex job from the schedule:
-
Go to Setup → Environments → Jobs → Scheduled Jobs.
-
Find the Batch_DocumentSender job.
-
Click Del to remove it and click OK to confirm.
-
-
Schedule the Apex job manually:
ctsign.Schedule_BatchDocumentSender schbatchDocumentSender = new ctsign.Schedule_BatchDocumentSender();
System.schedule('Batch_DocumentSender started at 0 minutes of the hour', '0 0 * * * ?', schbatchDocumentSender);
System.schedule('Batch_DocumentSender started at 15 minutes of the hour', '0 15 * * * ?', schbatchDocumentSender);
System.schedule('Batch_DocumentSender started at 30 minutes of the hour', '0 30 * * * ?', schbatchDocumentSender);
System.schedule('Batch_DocumentSender started at 45 minutes of the hour', '0 45 * * * ?', schbatchDocumentSender);
-
-
Signatories receive the email from DocuSign to complete signing, even if the Device option is selected in the Signatory Place field for the Signature button.
-
The final document will be attached to the corresponding Sign Document record.
-
The Sign Document record with the final PDF will be linked to the record that started the signing process.
-
If the parent record has not been synced yet, launch the synchronization to send the record to Salesforce and link it to the parent record.
-
If the parent recording has been synced, no additional sync is required.
-
Handle Online Flow
When a user has signed a document in the CT Mobile app, the status of the Sign Document record will change to Completed on Device. Given the status, the SignDocumentProcess trigger will fire to attach the final document to the Sign Document record.
Handle Errors
If any errors occur on the records described above, the sync process will include the Sync Recovery functionality.
-
If an error occurs while sending the Sign Document record (or any of the records that it refers to via reference fields), then the Sign Document record will be sent with the help of the Direct access option.
-
The related ContentVersion record will be sent as usual via synchronization.
-
The ContentDocumentLink record, which is linked to the Sign Document record, will be sent with the help of the Direct access option.
-
If records in steps 1 or 3 could not be sent via the Direct access option, the CT Mobile app tries to send them using the Proxy object option. If unsuccessful, a corresponding error will be listed on the Errors screen.
Document Storage
When a user signs a document, a ContentVersion record and the ContentDocumentLink record are created. These records and the ContentDocument record represent a File that links to the Sign Document record.
-
ContentDocument is the information about the file and a link to the latest published version. The ContentDocument record is automatically created on the Salesforce side when the ContentVersion record is inserted.
-
ContentVersion is the content of the file in the base64 format and the template attributes.
-
ContentDocumentLink stores the link between the ContentDocument and the record to which this file is attached.