5. Connect Salesforce with the Application Service and DocuSign
|
This article is applicable only if you use template with the DocuSign sign method. |
In case to process signatures by an e-Signature provider, it is necessary to connect the Salesforce organization with the App Service and the e-signature provider. Currently, you can connect only to the DocuSign provider. Read more at DocuSign support portal.
1. Save 18-character Code of your Salesforce Organization
-
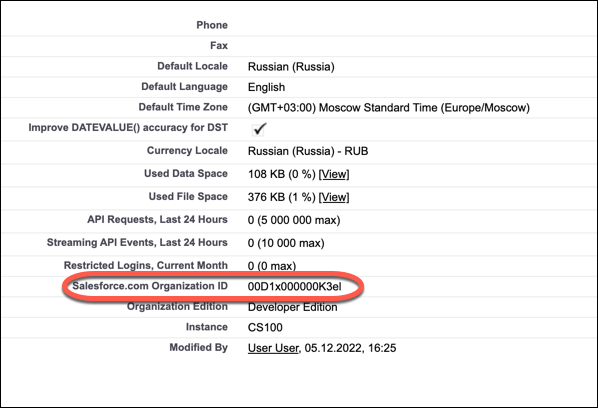
Go to Setup → Company Settings → Company Information.
-
Copy and save the Salesforce.com Organization ID value.
-
Open any of Salesforce 15 to 18 characters converters, for example, this one.
-
Convert the Salesforce.com Organization ID value to 18-character format and save it.
2. Create DocuSign Account and Set Up Connect Configuration
-
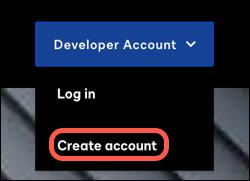
In the Developer account picklist, select Create account.
-
Fill out the form and click Get Started.
-
Proceed to the account activation link from your email box.
-
Set password and click Log In.
-
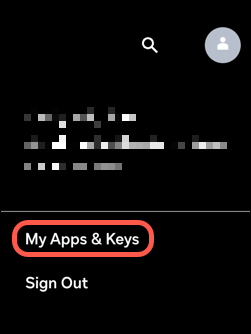
Click on your account icon and select My Apps & Keys.
-
Click Add App and Integration Key.
-
In the App Name field, type in an application name (for example, CT Sign).
-
Click Create App.
-
Copy and save the Integration Key value.
-
In the Authentication section, click Add Secret Key. Copy and save the secret key.
-
Click Generate RSA.
-
Copy and save the Private Key value.
-
In the Additional Settings section, click Add URI.
-
In the Redirect URIs field, type in
https://sign.customertimes.com/auth/docusign/callback. -
Click Save.
-
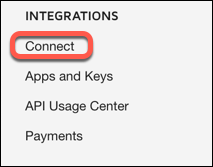
In the left menu, in the Integrations section, click Connect.
-
In the Add configuration picklist, select Custom.
-
Fill out the fields:
-
In the Listener Settings section:
-
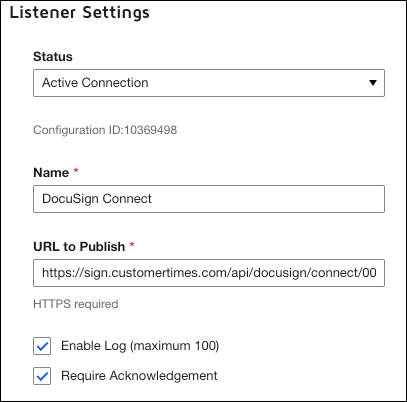
Name: DocuSign Connect.
-
URL to Publish:
https://sign.customertimes.com/api/docusign/connect/<18-character Organization ID>
-
-
In the Event Settings section:

-
Data Format: Legacy.
-
In the Trigger Events subsection:
-
In the Envelope and Recipients list, select all available checkboxes.
-
In the Include Data list, select checkboxes:
-
Time Zone Information;
-
Envelope Voided Reason;
-
Document fields;
-
-
-
-
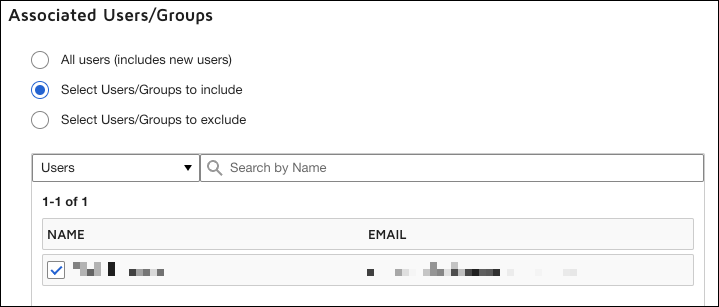
In the Associated Users/Groups section:
-
Click Select Users/Groups to include.
-
Select your account.
-
-
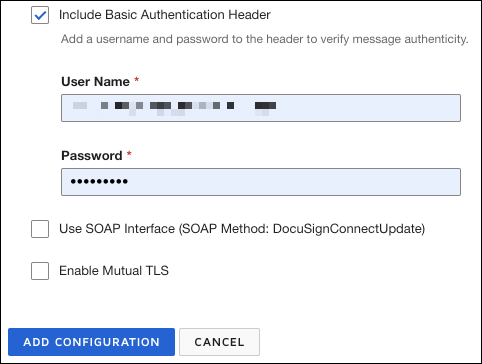
In the Integration and Security Settings section:
-
Select Include Basic Authentication Header checkbox.
-
Fill in the User Name and Password fields.
It does not have to be username and password from your DocuSign account, you can specify any username and password. But they must match the username and password you will specify in the DocuSign Connect tab.
-
-
-
Click Add Configuration.
3. Connect the Salesforce Instance with the Application Service
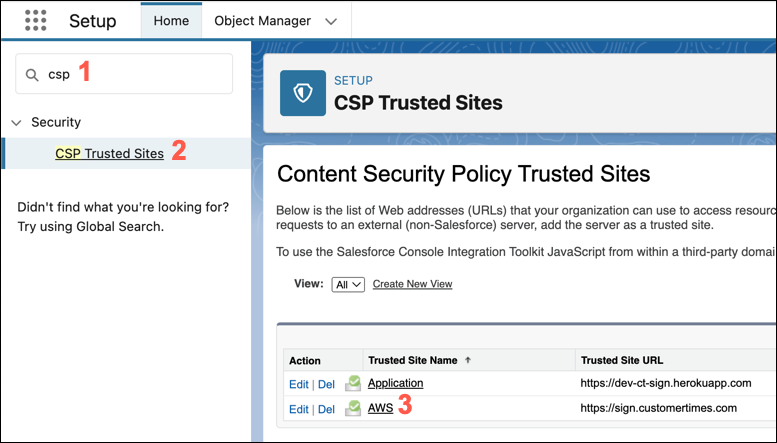
-
Go to Setup → CSP Trusted Sites.
-
Click on AWS.
-
Click Edit.
-
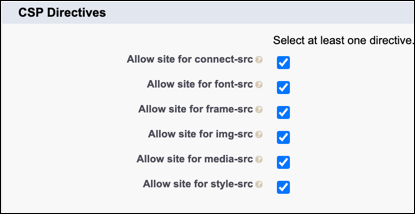
In the CSP Directives section, select all checkboxes.
-
Click Save.
-
Go to CT Sign Control Panel → CT Sign App.
-
In the Application Url field, specify the path
https://sign.customertimes.comand click Connect. -
On the next page, enter your Salesforce credentials and log in.
-
Allow CT Sign to access your data and perform requests.
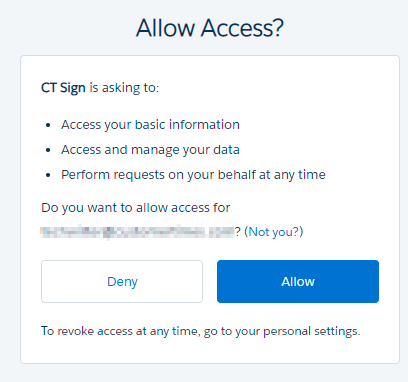
If successful, you will be redirected to the CT Sign app tab, and the token to access the Application Service will be added to the protected Sign Credentials custom setting.
|
Please re-enter DocuSign parameters after promoting your integration key from your developer account to a production DocuSign account. Documents sent from the developer DocuSign account are not legally binding and are watermarked. |
4. Connect DocuSign App
-
Go to CT Sign Control Panel → DocuSign App.
-
Enter keys of the DocuSign app in the DocuSign account:
-
Client Id.
-
Client Secret.
-
Client Private Key.
The value should be entered with the specific header and -----BEGIN RSA PRIVATE KEY----- and -----END RSA PRIVATE KEY-----.
-
-
Select the Production checkbox if you use the DocuSign production account.
-
Click Send.
If you see an error message, add
http://localhost:5000/auth/docusign/callbackas a second redirect URI in the DocuSign App configuration and try again. -
On the new page, enter your credentials of the developer or production DocuSign account.
-
Allow CT Sign to access your data and perform requests.
If successful, you will be redirected to the DocuSign App tab.
5. Send Authentication Data to DocuSign
On the DocuSign Connect tab, specify the following to receive the current status of the document sent to sign in the DocuSign:
-
Go to CT Sign Control Panel → DocuSign Connect.
-
Enter the Username and Password of the DocuSign Connect.
-
Click Connect.
The setup is complete.