Template Editor Feature Reference
Template Editor is intended to create and edit HTML-based templates for documents being signed. It has several sections grouped by functionalities.
Available Features
Template Editor is based on the open-source project, CKEditor 5. To view the basic features, go to the CKEditor 5 Documentation portal.
Also, there are dedicated Salesforce-specific features.
|
If you want to add your HTML template, use the 18-digit IDs for these images. |
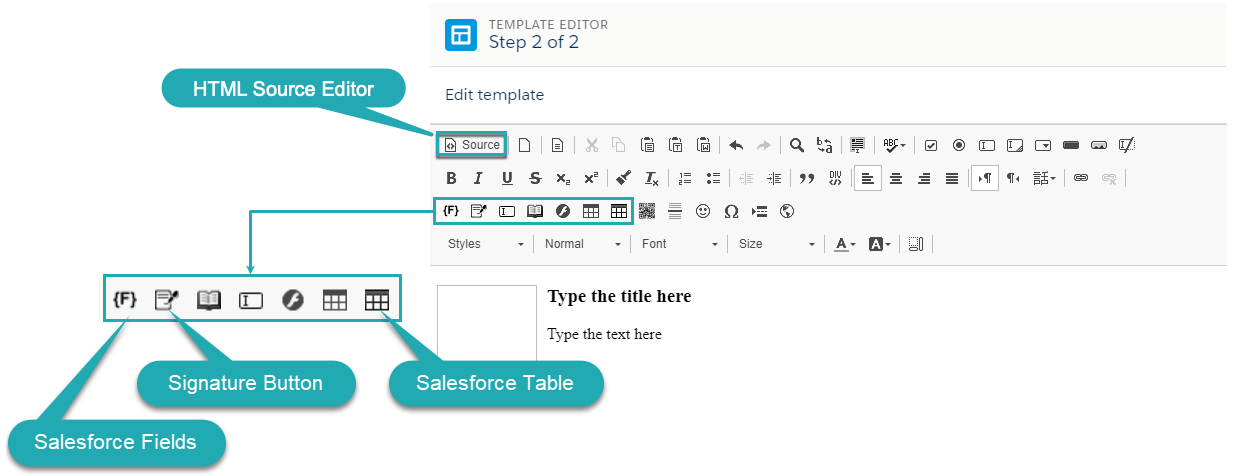
Salesforce Fields
Add a marker to display the value of the selected field of the object to sign. A marker will be replaced by the value of the indicated field while forming a document. If the required field is empty, the marker will be replaced with a blank space.
To add a field:
-
Click the Salesforce Field button –
 .
. -
Select an available field in the Field token to Insert picklist.

-
Click OK.
The Salesforce field is added. On the template layout, the API name of the field is shown.
Salesforce Table
Salesforce table allows displaying values from the fields of the related object. The rows of the table are filled out with the Value word during the editing of a template and replaced with real value while forming a document. If the related field of the object’s record is empty, the marker will be replaced with a blank space.
Use the Salesforce table to display Salesforce data in a document for signing according to the specified conditions.
-
Click the Salesforce table
 icon.
icon. -
Fill in the information:
-
Define Columns, Width and Height, and the size of the outside Borders.
-
Define the space between cells in Cell spacing and a cell height in Cell padding.
-
Define the Alignment of the text in the table.
-
Add the table name in the Caption.
-
Add a description in the Summary. The description will not be shown in a template.
-
Select the object from which the values will be added to the table.
-
-
On the Salesforce Table Properties tab:
-
In the objectCondition field, enter a SOQL filter to display only eligible records of the selected child object.
-
In the showCondition field, enter a SOQL filter to display the Salesforce table only on the matched records of the parent object.
-
-
Click OK. The table is added to the template.
-
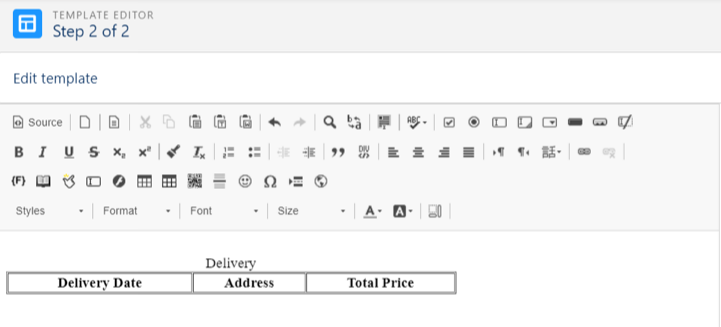
To define fields that will be displayed in the Salesforce table, click the Source button and edit the HTML code. For example, to define 3 headers (Delivery Date, Address, Total Price), insert the following code:
<table border="1" cellpadding="1" cellspacing="1" child-table="orders__Delivery__c" objectcondition="SELECT orders__DeliveryDate__c, Address__c, orders__TotalPrice__c FROM orders__Delivery__c" style="width:500px;" summary="delivery-table">
<caption>Delivery</caption>
<thead>
<tr>
<th scope="col">Delivery Date</th>
<th scope="col">Address</th>
<th scope="col">Total Price</th>
</tr>
</thead>
<tbody>
</tbody>
</table>
As a result, you will get the following:
-
Click OK.
The Salesforce table is set.
Here are some examples:
-
SOQL filter to output the template only to the matching contacts of the parent Organization record.
<table border="1" cellpadding="1" cellspacing="1" child-table="orders_OrderLineItem_c" class="forcetable" id="forcetable-6" objectCondition="SELECT Name, FirstName FROM Contact WHERE AccountId = '{!MainObjectId}'"> -
SOQL filter to display the table only on matching Visit records.
<table border="1" cellpadding="1" cellspacing="1" child-table="orders_OrderLineItem_c" class="forcetable" id="forcetable-6" showCondition="FROM RetailVisitKpi WHERE AssessmentTaskId.TaskType = 'PlanogramCheck' AND ParentId = '{!Visit.Id}'">
Create a Signature button
The Signature button should be specified for each signer to the template. The selected parameters of the button will affect the list of available signers, signature type, authorization type, etc.
The list of parameters that should be specified:
| Parameter | Description | ||
|---|---|---|---|
Signatory |
|||
Title |
The button name is displayed on the generated PDF document. |
||
Signatory Type |
Select the object to add as a signatory. Available values:
|
||
Signatory Source Type |
Available when Contact is selected as Signatory Type. Available values:
|
||
Signatory Source Reference |
It defines with which object the signatory is associated. Available values:
|
||
Select Signatory |
Select a field that stores the signatory records according to the Signatory Source Reference value:
|
||
Signature Type |
Select a verification type. Available values:
|
||
Signature Place |
Available when the Provider is DocuSign. Select how to confirm the signature. Available values:
|
||
Authorization Type |
Available when the Provider is DocuSign. Select how to authorize a signatory. Available values:
|
||
Image Width, px |
Specify the width of the attached signature. |
||
Image Height, px |
Specify the height of the attached signature. |
||
X-Offset |
The horizontal indent. |
||
Y-Offset |
The vertical indent. |
||
Notification |
|||
Signature Require Notification |
The template title according to which the notification letter is generated with signing demand. |
||
Document Signed Notification |
The template title according to which the letter is generated with the notification about signing. |
||
| Header 1 | Header 2 | Header 3 |
|---|---|---|
Column 1, row 1 |
Column 2, row 1 |
Column 3, row 1 [.highlight-row] |
Column 1, row 2 |
Column 2, row 2 |
Column 3, row 2 |
Column 1, row 3 |
Column 2, row 3 |
Column 3, row 3 |