Working with CT Vision Lite in the CT Mobile App
To work with CT Vision Lite in the CT Mobile app:
-
Log in to the CT Mobile app.
In the CT Mobile app, a sales representative:
-
takes photos of the shelves in the stores,
-
checks the status of the photos,
-
adds photo tags to filter photos if needed.
In this article, you will learn about opportunities of the CT Vision Lite module in the CT Mobile app:
Creating a Report Summary
|
In the Simple View, the report data and the final summary report will not be displayed and previewing pictures in full size will be disabled. |
To create a report summary:
-
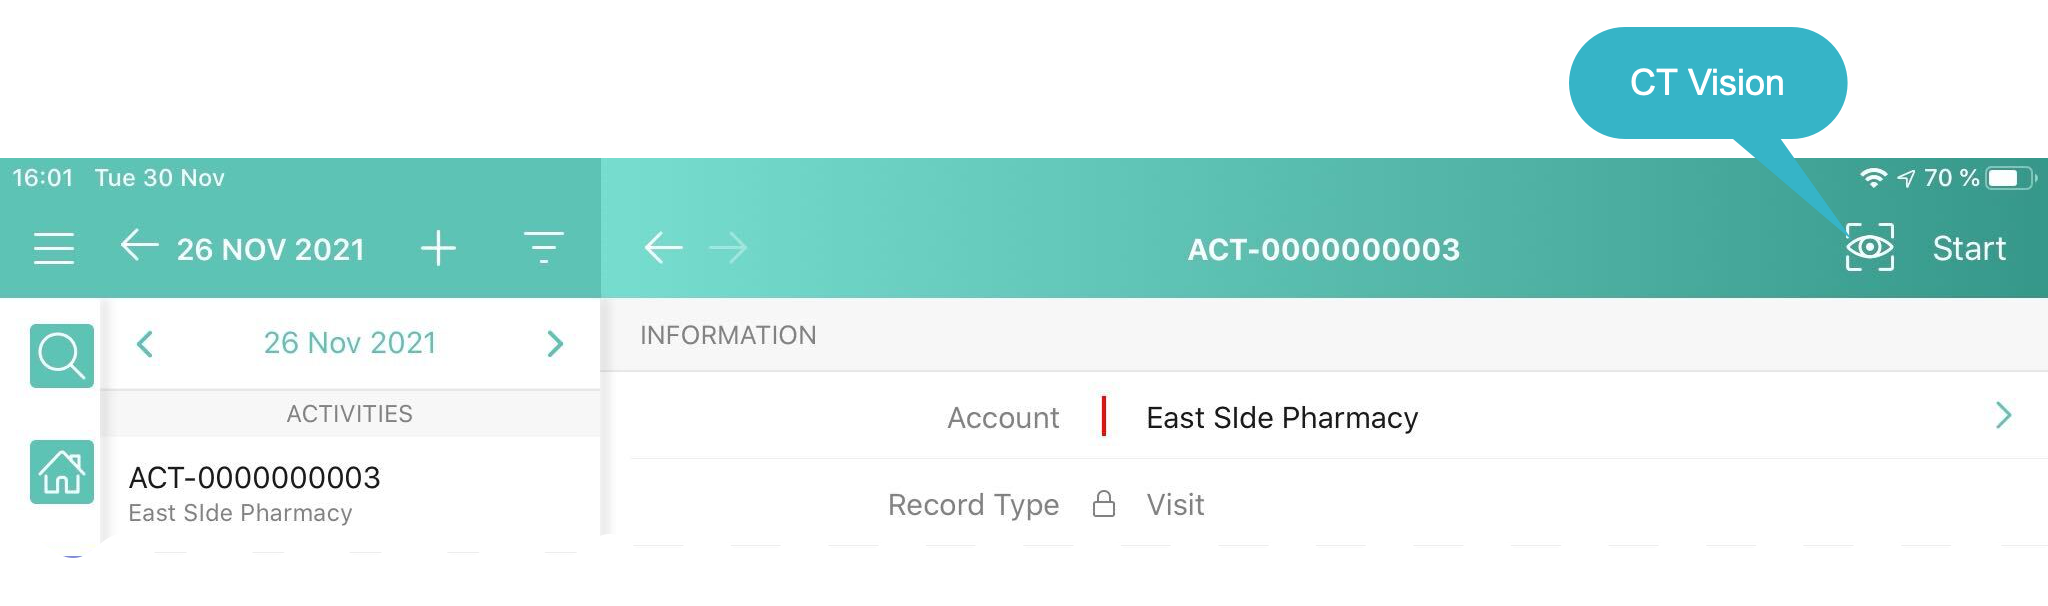
Open a Vision Object record (for example, Activity) in the CT Mobile app and tap the CT Vision icon.
-
Select the shelf type on the left side of the screen. Hints for the selected shelf will be displayed at the bottom of the screen or in the pop-up. For more information, refer to Vision Hint Field Reference.
If the Vision Shelf Field setting is not created, shelves will not be displayed.
-
Point the tablet at the desired shelf and tap the Photo button.
-
The Photo button is active when the indicator that displays the position of a device relative to the horizon is green:
-
 : the device is tilted.
 -
 : the device is aligned with the horizon.
-
-
-
Take a photo depending on the shelf type.
-
Use the Photo type for a standard shelf, or select the Collection mode to create a photo from multiple shots at the custom size shelf.
-
Retake the photo when the warning indicates that the image quality is not satisfactory.
-
If the photo size is more than 2.5 MB, the photo will be compressed.
-
The actual and planned number of photos, the number of errors, and the actual number of the required report summaries are displayed on the header of the screen.
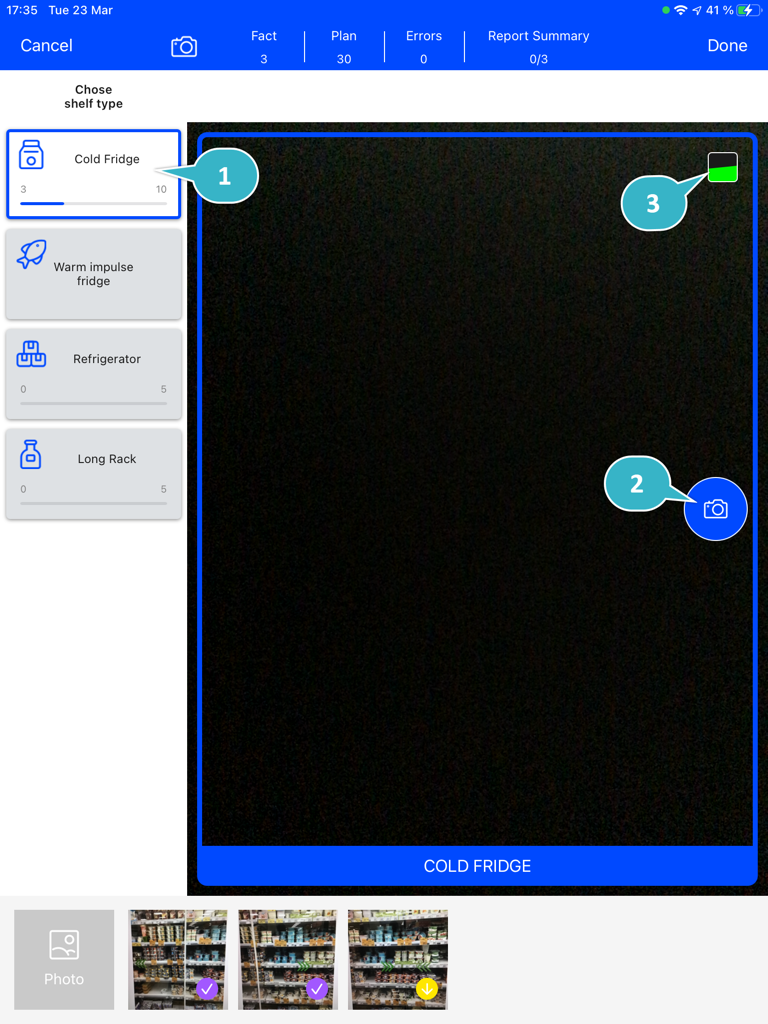
Photo
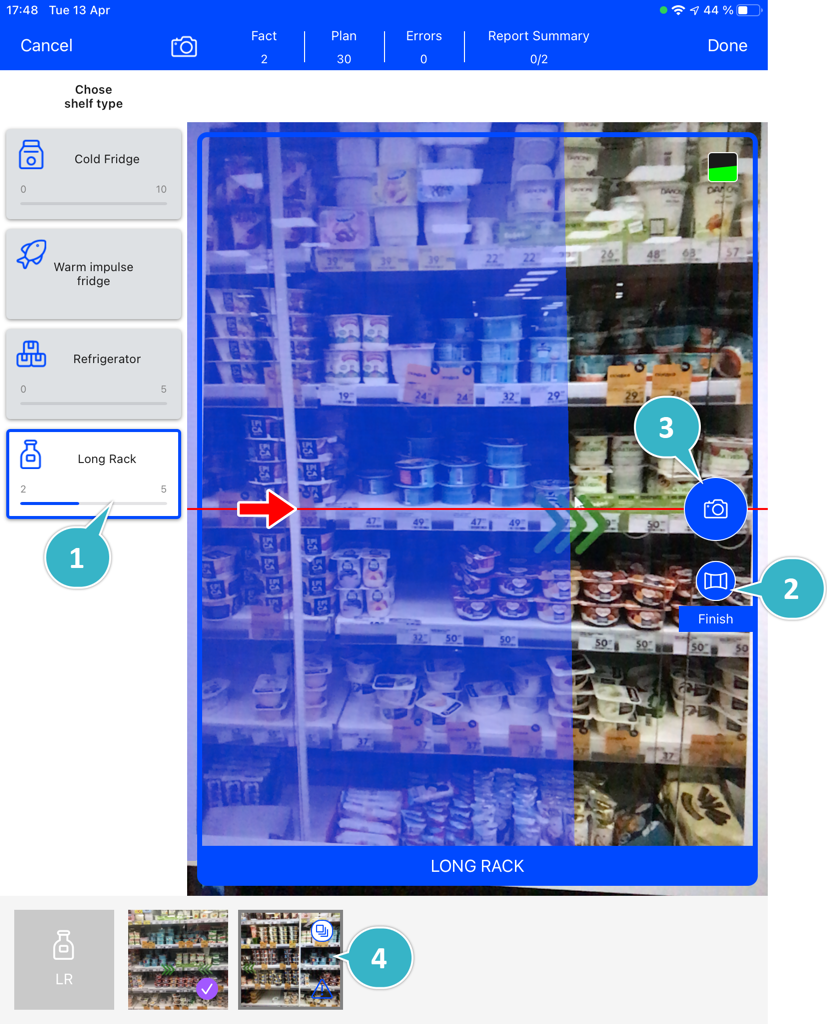
Collection
When an indicator (3) is green, tap the Photo button (2) for the selected shelf type (1).
-
The taken photo will be displayed in the Miniatures gallery at the bottom of the screen.
-
The photo is sent to the server and the appropriate status indicator is displayed on the photo in the Miniatures gallery.
Use this mode when you cannot fit the shelf in one photo, so you have to take multiple shots of adjacent shelf sections. Taken photos will be merged on your device on the go and are sent to the server as a single long shot.
When an indicator is green, tap the Start button (2) for the selected shelf type (1) to initialize the making of the photo collection.
-
Tap the Photo button (3) to take photos. A half-translucent colored block covers the area you have already shot. Move your device so that the area is still visible on the edge and take the next shot.
In the Collection mode, only the last taken photo may be removed.
-
When all photos are taken, tap the Finish button (2) to complete the collection.
-
All photos are displayed as miniatures with statuses and the
 icon in the Miniatures gallery.
 -
To view the merged photo, tap on photo (4) in the Miniatures gallery. Use scroll to see all parts of the image.
-
-
-
-
If Enable Gallery = true, add photos from the device gallery by tapping the Add Photo button (4). Select up to 9 photos and tap Done.
-
Repeat steps 4–5 to take the planned number of photos for the current visit.
-
If needed, manage errors:
-
Manage errors according to the status indicator on the photo in the Miniatures gallery.
-
Manage photo tags.
-
-
After all photos for all shelves are taken, tap Done to create a report summary.
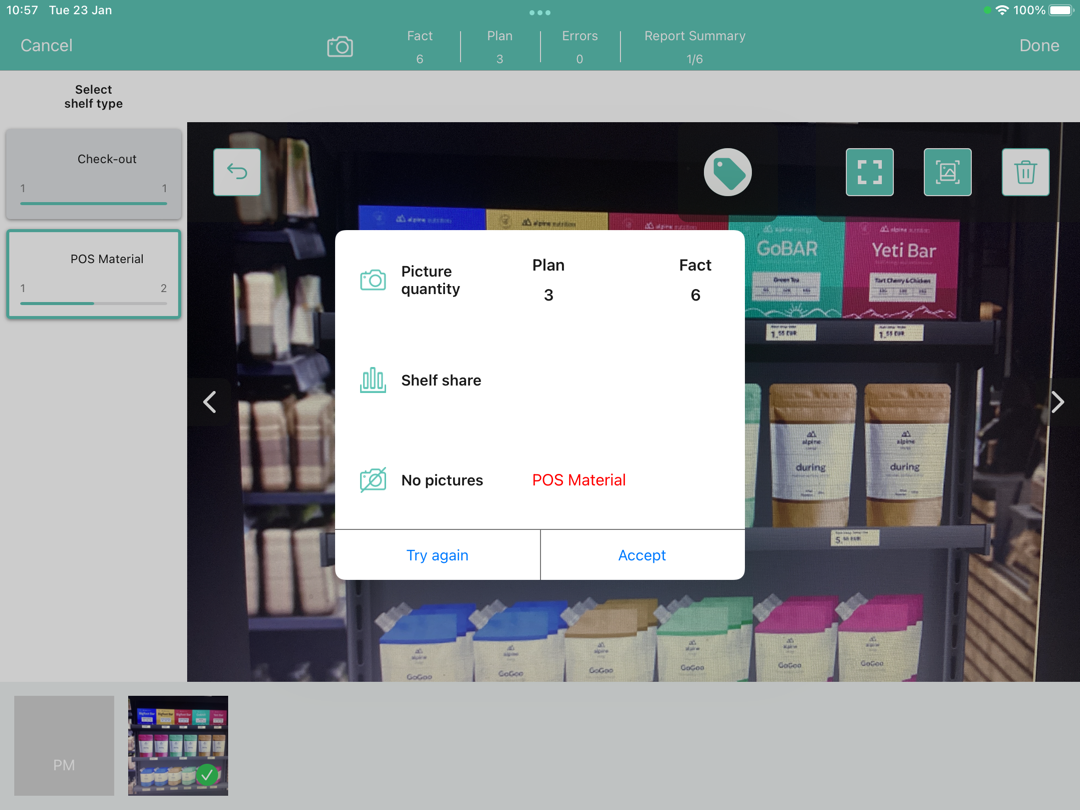
The final report summary will be displayed.
-
Review the report:
-
In the Pictures Total, compare the planned and taken number of photos.
If there are no shelves or the planned number is not set, the planned number of photos is taken from the Plan field of the Vision Object record. Otherwise, the planned number is the sum of the values from the Plan field of the Vision Shelf records.
-
In the Pictures Absence, verify shelves, for which there is no photo or the actual number of photos is less than the number specified in the Plan field of the Vision Shelf record.
-
-
Tap Accept to save the report.
-
Tap Try again to go back to taking photos and managing errors.
Simple View
If the Enable Simple View option is enabled, the header with the report data (the actual and planned number of photos, the number of errors, and the actual number of the required report summaries) and the final summary report will not be displayed. Also, previewing pictures in full size will be disabled:

Status Indicator
The statuses can acquire the following values:
| Status | Description |
|---|---|
Yellow |
Waiting for server response. |
Red |
An error has occurred. |
Purple |
The photo is successfully uploaded. |
Green |
The photo is successfully uploaded and full sync is completed. |
The status indicator is displayed on the taken photo in the Miniatures gallery.
If an error occurred during photo processing, the status indicator changes to red. Tap on the miniature with the error to select further action:
-
Tap Confirm to confirm the photo with an error.
-
Tap Retake to delete the taken photo with an error and make a new photo.
-
Tap Delete to remove the taken photo. If the first photo has been deleted, the camera opens. Otherwise, the previous photo opens.
The photo will be deleted if the device has access to the Internet, as the photo is physically on the server.
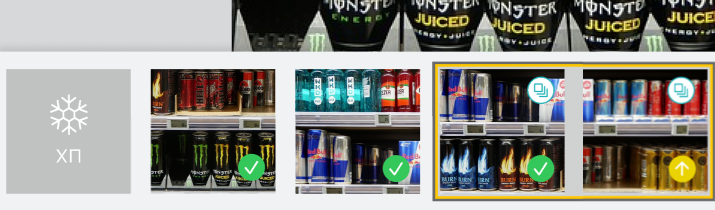
Image Management Tools
Tap the desired photo in the Miniatures gallery to open it.
-
Tap the
 icon (1) to delete a photo.
 -
Tap the
 icon (2) to go back to taking photo mode.
 -
Tap the
 icon (3) to add a photo tag.
 -
Tap Done (4) to open the Report Summary.
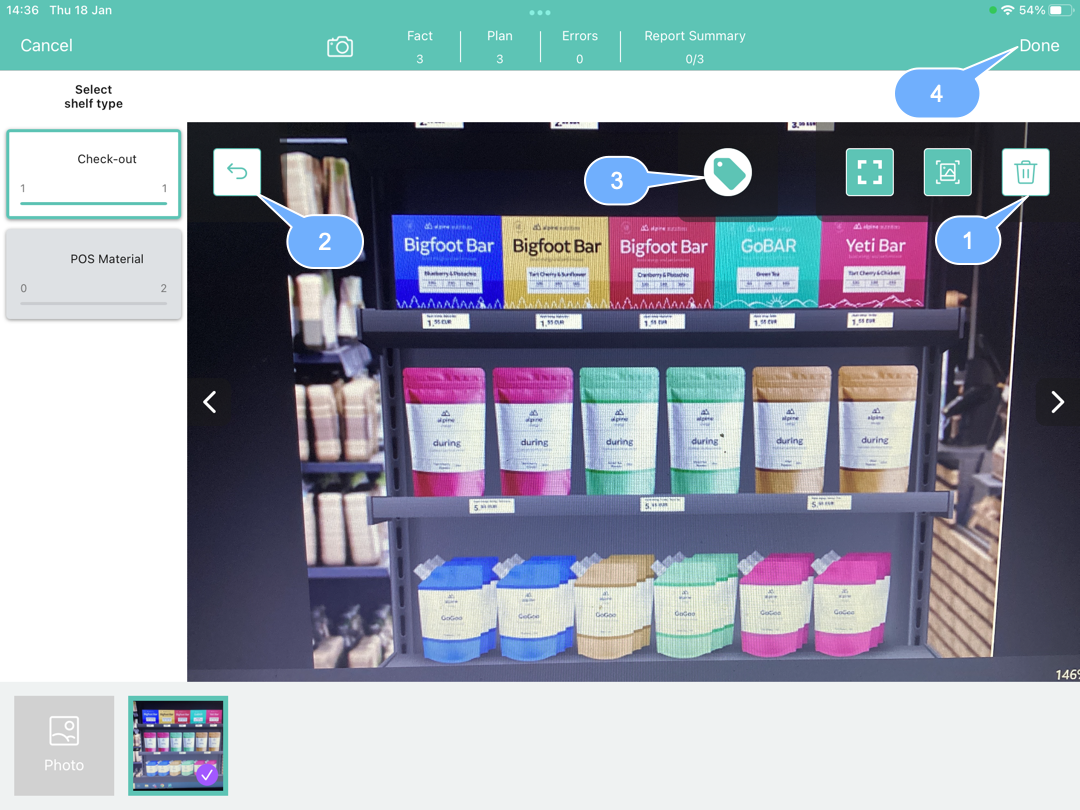
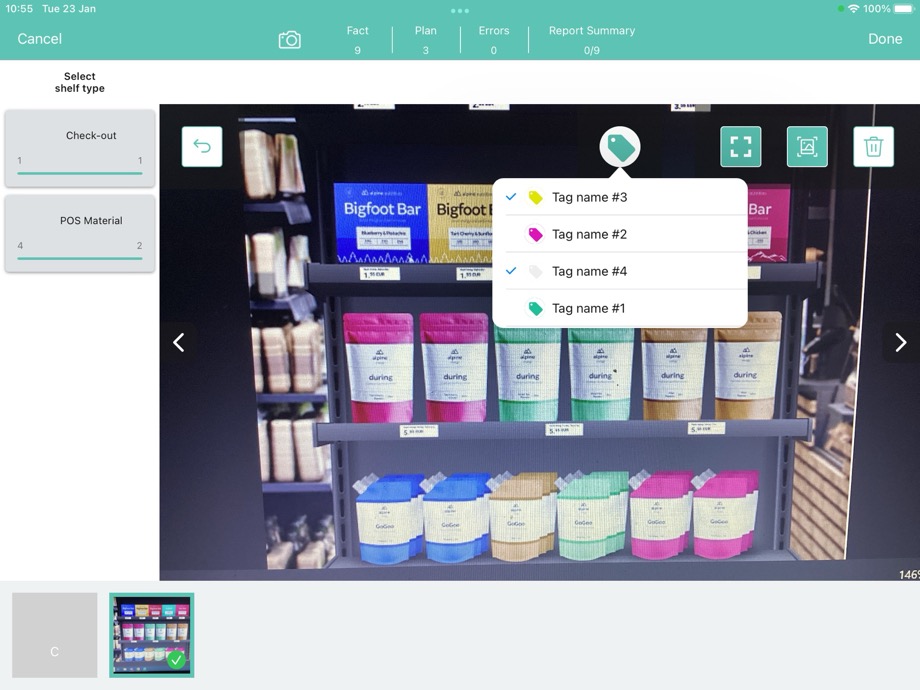
Photo Tags
To enable photo tags for the CT Mobile application, add the Tag offline object in the CT Mobile Control Panel / CT Mobile Control Panel 2.0: Offline Objects.
If enabled, add a photo tag to the desired photos.
-
Tap a photo in the Miniatures gallery.
-
Click on the
icon on the selected photo. -
In the pop-up, tap to select tags from the list of available tags to add them to a photo.
-
Click
to go back to taking photos.
The tag is added. In the Miniatures gallery, the photo tag icon is displayed on the photo.
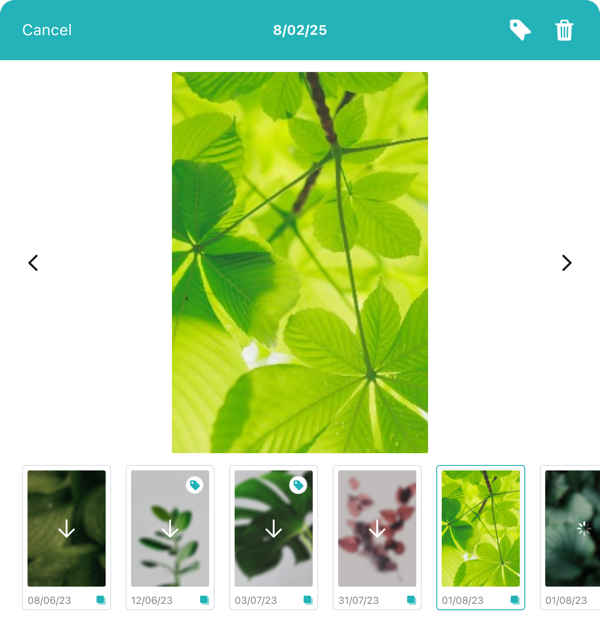
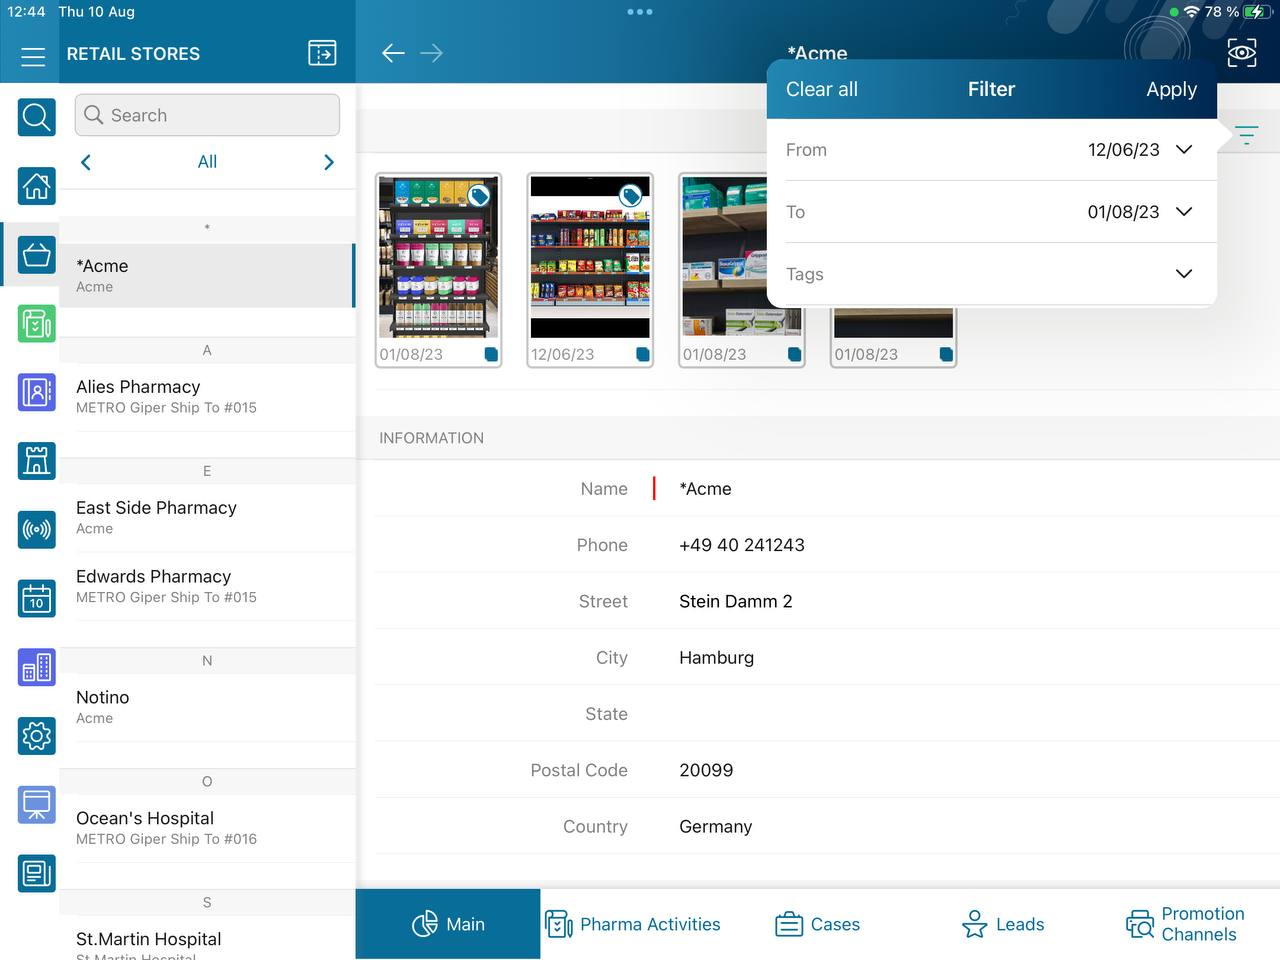
Pictures Gallery
Add the Pictures gallery to the Vision object mobile layout to view photos that you have taken. Also, you can specify the Parent object and Parent Object Lookup fields on the Vision object to view photos taken for another object (for example, to view photos from all Activities related to the selected Account record).
| The gallery is displayed when at least one photo is taken. |
-
In the case of many photos, scroll them horizontally.
-
Filter photos by dates and tags.
-
Tap the photo to open the gallery and view photos in a full size. This feature is disabled if the Enable Simple View option is turned on.
-
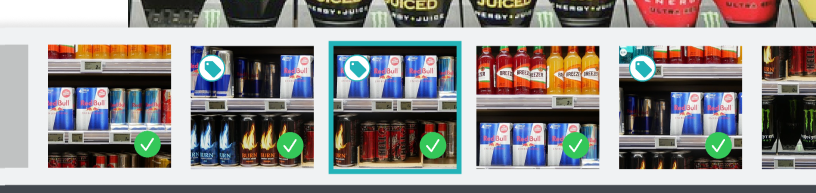
While viewing photos in a full size:
-
Tap the
 icon to see the photo tags.
Photo tags are displayed according to their object and/or its record type. For example, if a photo was created on the Account object, you will see only photo tags that are also created for the Account object. Or, if a photo was created on the Customer record type of the Account object, you will see only photo tags that are also created for the Customer record type. -
Tap
 to delete the photo.
This feature is available starting from version 3.0 of the CT Mobile iOS app.
-